Working on the house through a four-day weekend. It’s only day two and I’m already wiped out. Keeping me going is a new collection of photographs I’ve been pulling from design blogs to use as inspiration (mostly from apartmenttherapy.com).

I’m really liking this house, and I think it’s a realistic look for me because the designer was working with similar restrictions: crappy wood floors and a very narrow living room. As much as I’m hearing “don’t paint your floors!” when I look at this, I think it could work. And save me a hell of a lot of money. Plus the gray would match the slate color of the floors in my kitchen and dining room, giving the first level of the house some continuity.

I’m probably not bold enough to go with the wall-sized mural. On the other hand, how much would I love this bathroom?

My current bathroom inspiration, however, is this one:

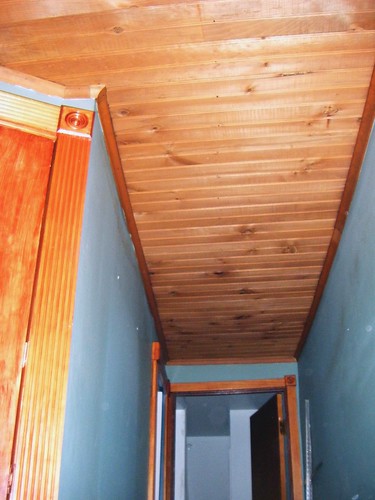
I’ve got the same wall boards and trim, but I never would have thought to match them to the ceiling. I just started working on this room a few months ago and I’m already thinking of repainting.

Ugh, so much to do!

Trash picking in Jack’s neighborhood is the best. A few weeks ago, I found a beat-up picture frame on the street and snagged it for this project: cheap whiteboard!

After gluing the corners back together, I picked up a piece of acrylic sheeting at the hardware store and cut it to fit. It took forever; none of these Home Depot/Lowes places cut glass, plexi, or anything like it anymore. So I did it myself with a big old blade and a million passes. Paint the back side with white paint, and:

The surface doesn’t seem to love all dry erase markers, but my cheapies from IKEA work just fine (no ghosting!). Total cost: $15.

Neighborhood Watch

Neighbor: I hope this slush doesn’t freeze and leave the sidewalks all icy.
Me: Hey, I’ve got a bag of salt if you want me to throw some in front of your house…
Neighbor: Yeah, I know. I saw when you put that down. I came out to shovel right after you.
Me: Ah, gotcha.
Neighbor: Did you get a new car? I watched you clean that new one over there off.
Me: …Yeah. Uh, I’m going to go inside now. Unless you’ve also found a way to watch me in there.

Work on the house continues. In this month’s installment, the upstairs hallway!

Before:

After:

The carpet still needs to be yanked, but that’s a project for another day.

Finally, the last green-blue wall has been covered.

I also got to incorporate my first pieces of actual art into this home renovation project. These are drawings I made for a show at Lincoln Financial Field a year or two ago.

Today’s list of accomplishments:

  • Got an iPhone!
  • Picked out some apps, including those relating to Twitter, Facebook, and uh, my budget. Still needed: a Blogger app and a Flickr app.
  • Synced it with my Google calendar and contacts list, inspiring a thorough cleanup of both.
  • Got a doctor’s appointment out of the way.
  • Started painting my hallway. Not nearly as exciting.

A limb came off one of the street trees near my house during our most recent snow storm. After walking past it few times on my way to the grocery store, I decided to cut a couple of branches off and take them home. The thicker parts were grey, with reddish tips indicating more recent growth — a nice combination of colors to accent my warm-grey living room.

At first I figured I’d put them in a vase, but they were just too cumbersome to walk around. My next thought was to mount them to the wall. A quick glance at my super-low ceilings nixed that idea — not enough space. (But hey, my heating bill is low, too, so I can’t complain.) I had to find a way to tame the tree.

So I came up with this fun little project. Plan C: turn the branches into a 3-D “painting,” without the frame.

I rummaged through some old art supplies and picked a piece of illustration board to use as a size guide. Then I arranged a couple of branches on top, minding the composition the twigs were creating across the rectangle’s field.

With a trusted Sharpie, I marked the places where the branches hit the edges of the board. I then hacked across my Sharpie lines with a jeweler’s saw, mimicking the boundaries of the board.

Now I had a couple of branches cut into a perfect rectangle. And a carpet covered in sawdust.

The tricky part of this project was deciding where to place a few finishing nails so that they might hold the branches to the walls. This involved some guesswork, a lot of fumbling with a measuring tape, and — [sad trombone noise here] — math. I choose some likely locations and marked their x and y coordinates, measuring from the bottom left corner of the board.

Transferring those locations to the wall was annoying, too, but it worked! With a bit of tweaking, I had my very own branch painting.

Extra twigs went here:

No aminals were harmed during the decorating…

Once in a while, the blogger behind It’s Lovely! I’ll take it! finds a real estate listing in which every picture of the house contains the same ugly green plastic chairs. Green chairs for the dining room table. Green chairs in the basement, backyard, bedrooms(?!). And it almost seems as though the chairs are alive, following the photographer through the house. Ready for their 15 minutes of fame.

That’s my house. Except instead of plastic chairs, I have peacock feathers.

In the living room (in a thrift store vase):

In the dining room (in a candle holder):

On the mantle by the fireplace (in a shot glass?):

In the office (in a empty bottle of vanilla extract?!):

In my bedroom (in a spool of THREAD?!):

I NEED TO BE STOPPED. When I sell this place, “It’s Lovely” is going to have a field day snarking on me. In fact, I think I may have just written their post for them.