Reservations

When I was a Sophomore in college, my then-boyfriend had a roommate who put the side of his bed right up against the window in their dorm. “Wouldn’t it be fun,” I thought, “to wake up and be able to peek out the window without even sitting up?” I had seen a room in an artist’s house with a similar configuration; he had designed it so that he could lie in bed and watch the sun set! So that Sunday, I got to work moving my own bed.

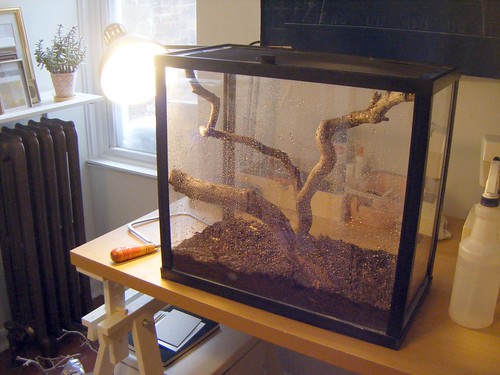
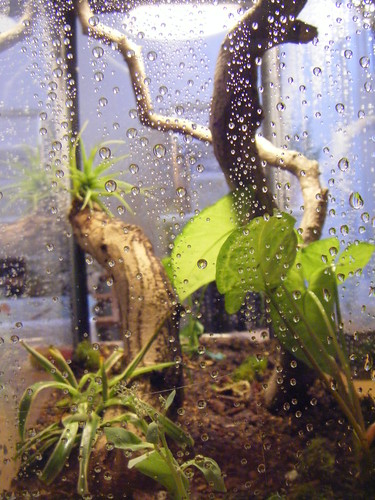
My dorm, however, was very different from my boyfriend’s suite and the artist’s house. I had a single room in what I understood to be a converted 19th-century epileptic ward. It was tiny and narrow, and to fit my art supplies inside of it I had found these ridiculous 3 foot-tall bed raisers and crammed everything underneath the bed frame. I also kept a 20-gallon fishtank in the room, somehow.

Moving the bed was no minor task, as there was zero room to maneuver. But I was determined. I pulled out everything stored under the bed, removed all of the furniture by the window, drained the fish tank (holding the actual fish in a bucket), removed the bed raisers so that I could tilt the bed enough to scoot it past my desk and dresser… and then I got stuck. The bed wouldn’t fit. I could get it over to the window by lifting its head up at a 45 degree angle, but there wasn’t enough room to lower the head back down. My dorm room was so narrow, it couldn’t fit a twin bed turned sideways.

At this point I believe I was 3 hours into the process and I had also cut my knee on the bedframe. But I had no choice: everything had to go back to the way it was. I spent another 3 hours undoing everything I had just done, while listening to The Cure and sobbing quietly.

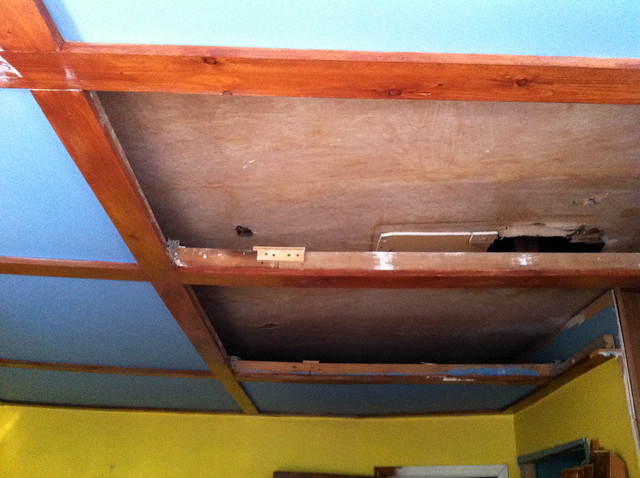
There was a moment or two yesterday in which I remembered the bed by the window catastrophe and wished that I hadn’t touched the house. I’m sleeping in the dining room. My dinner table is in the basement. My clothes are in my office. I can only breathe through one nostril at a time. Oh, and today I decided I should start moving outlets around so now the power to the TV is cut. Who knows how long this will drag on?

I think it’ll be worth it. I think. At least now I have my Dad to help/give advice/stage an intervention. He would have told me to measure that damn bed first.

Demolition, Day 3

Today started off well enough, save for the fact that I’m fiercely allergic to the drywall dust I’m kicking up in this here row home. Avoid dust and cats, my doctor tells me, which he must realize is completely impractical advice for anyone who isn’t living in a hermetically sealed chamber with no friends. If you have friends, they are cat people. I call this Mittens’ Law.

Anyway, my strategy for today was to don a dust mask and then wrap my face with a silk bandanna. It looked about as sexy as you think it did.

I finished removing the craft room closets this morning. Look at all the extra space I have! “Doesn’t look like much,” you’re probably thinking, but keep in mind that I took this shot while pressed up against the opposite wall. A few extra feet makes a difference in a space this small. The room could now accommodate a full size bed instead of just a twin, which I will remind myself is good for resale value as I repetitively flush out my nasal cavities with saline over the next week.

Eventually, when the drywall is patched and painted, I’ll reassemble my cheapo Ikea ANEDOBA wardrobe (created by the Ikea designer with the winning-est name, Tord Bjorklund) and use that for storage. In the extra space I’d love to include one of these convertible ottomans by Hollandia:

I’d use it as a dressing bench, but it also folds out to make a little bed! That’s about as close to a guest room setup as I’ll ever get. Unfortunately, it’s way out of my price range. A girl can dream…

While I was still swathed in bandanna I decided to tackle the drop ceiling in the master bedroom. This is where things got a little hairy.

I suppose I thought that the blue and poo ceiling was so ugly, whatever was lurking behind it couldn’t be that bad. But as I started pulling down the drywall boards I got a series of fun surprises.

Picture 085

The original ceiling is in really rough shape. It sags dramatically towards the middle of the room, and I fear that I (or my Dad and I, or a contractor and I) will have to remove it completely and start from scratch.

Additionally, the second ceiling was constructed… questionably. Is “questionably” is a good word to encompass the fact this beam appears to be suspended from a screw with florist wire? Also, as I yanked one of the panels down, the brick pictured above went sailing past my head. Perhaps the florist wire was necessary to counteract the weight of the brick booby trap. It all makes sense. If you’re a Collyer brother.

To avoid sleeping under that terrifying sagging disaster and to stay as far away from the dust as possible, I have set up camp in the dining room. The booze is practically an arms-length away! And I’m going to need it!

Surprise Demolition

For Christmas, my very thoughtful mother bought my sister and me sewing kits. You wouldn’t think such an innocent gift would end up costing me thousands of bucks, but…

I took my kit home to the craft room and attempted to put it in a closet, but I was kinda out of room. So I removed all the towels and sheets and art supplies and prepared to reorganize. But before I could get started, the sheer ugliness of my bare closets caught me by surprise.

I mean, this displays a pretty consistent inability to use a measuring tape. I may be math challenged when compared to my brilliant parents, but I can’t have people thinking that a) I made this closet, and b) I can’t add.

An hour or two later, I had grabbed a drill, a hammer and a crowbar and was pulling the closets down.

But before we get to those pictures, here’s a reminder of what the closets used to look like. There’s a whole wall of the mis-measured, crooked things. I had removed their doors and covered the uneven moldings with curtains.

Blah. You know what would be better than pretending they’re not ugly? Ripping them out! And reclaiming some of the space they’ve stolen.

I have a similar plan for the bedroom closets: take them out, refinish the walls behind them, and insert modular IKEA wardrobes. I think this is a better use for the space because all of these built-in closets are narrow and deep, so they take up more floor space than is practical in my tiny bedrooms. And things tend to get lost in the backs of them, since you have to stack everything in front and back piles.

Now, of course, since I’m taking the closets out I’ll also need to take the laminate floors out (they’re incomplete where the closet walls touched the floor). And if I’m removing them in this room, I might as well do it in the office too. So I’ll get my upstairs floors refinished like I did on the first floor. Then I’ll probably want to tile the bathroom. Then…

Pipe Shelving Unit – Finished!

It has been a long time coming, but today I finally get to share with you some before…

…and after pictures!

90% of the pipe shelving unit project was preparation. After the measuring, planning, re-planning, struggling to find supplies, etc. was behind me, the project came together in just a few short hours. I had expected to spend all weekend assembling the unit, and later to sum up the experience with a blog entry that began, “No part of this project was simple — do not attempt!” And yet I found myself staring in bewilderment at a finished product sometime around 3:00pm on Saturday. But let’s go back to the beginning.

The first step was to trim my longer two boards down a bit (I was too generous when estimating the size of my wall), and then to drill several 1″ holes at specific points where the pipes would pass through.

This picture makes my basement “woodshop” look almost respectable. I assure you, it is not.

Once the cutting was finished and the boards were sanded a bit, I briefly considered patching up all their knot holes and staining them darker. But what I liked about this project was that it used only industrial materials — in keeping with the theme, I had purchased the cheapest utility-grade wood possible — so why not just embrace the imperfections? I decided to roll with the “scratch-and-dent section of Lowes-chic” look. This is probably what kept my assembly time down, and I don’t regret it at all. You’ve gotta cut yourself a break when you can.

From that point on everything was easy as pie, as demonstrated in this adorable gif:

avatars myspace with Gickr

Here’s a shot showing how the shelves are supported:

Since the elbow fittings are designed to have just the same height as the tee fittings, the boards sit very evenly on these two points. And since the majority of the weight of the unit rests right on the floor, all I had to do was secure the top flanges to the wall with a couple of drywall anchors. The unit is remarkably stable. I’ll have to wait and see if the boards start to deflect over time, but if they do I can easily unscrew the whole thing and replace them.

And that’s it! A 3-month project finally wraps up. I’m sure I’ll be posting more pictures soon, particularly when that vivarium’s new resident arrives…

Notes:

1) I’m sorry all of my pictures look like they’re taken with a fish-eye lens. I’m working with a super cheap camera right now.

2) I’d post the final supply list, but I’m pretty sure it would only work for someone with a floor as sloped as mine. I believe the pipes on the left, starting from the bottom, are 18″, 12″, 24″, 10″, and 18″ segments. The segments on the right are something like 29″, 24″, and 31″, though 32″ was probably ideal. Shelf supports are 8″ each and the pieces that connect to the wall up top are 10″, though if you can find 9″ that might work better. BUT only if your wall is nice and flat!

3) Yes, I know, I still have no baseboards. It’s been — what? — a year? I should really tackle that next.

After finally gathering all the supplies I need for the pipe shelving unit project, it was high time to start building the thing. But of course, it wasn’t that easy. Painting comes first.

And washing comes before painting. I laboriously stripped the grease off of each part using a scrubbing pad and dish soap. And my bathtub. I was not as thorough as I should have been. Meh.

I arranged the pipes outside to dry, and also to eyeball their overall lengths. The one on the left (which will end up on the right of the unit) is a bit shorter. This should work out well. Should.

I’m not naive enough to think I’m out of the woods with these pipes yet.

I used upside-down tomato cages to hold up the pipes for spray painting. How much does this photograph resemble a Dalek?

Exterminate. Exterminate.

That’s better. Glossy black paint can make anything look less janked up. This is another tip I learned from Morgan.

I was beginning to think that Project Pipe Shelving Unit was impossible. That the half dozen or so bloggers I’d run across who had made their own marvelous versions were just Photoshop-faking it. That there existed a vast conspiracy determined to prevent me from DIYing my own industrial-chic shelving.

Let me give you a run down of what it takes to get to this point — day 1 of construction — if you’re anything like me:

First, you will be guided by Morgan‘s comment not to go with the 1/2″-thick pipe she used, but rather 1/4″ or 3/8″ for a sleeker look. You will show up at Home Depot and discover that they do not stock this kind of pipe. You will go to Lowes and find the same thing.

You will go home and log countless hours of internet research. You will discover that you can order 3/8″ pipe online, but the online outlets won’t cut the few custom lengths you need.

You will poll your internet friends, asking them if they know of a hardware store that a) stocks skinny pipes, and b) is willing to cut a few custom lengths for you. A friend will tell you yes, he knows of a place and he has already talked to the staff there for you. You will call this place yourself and be told over the phone that your request is not a problem. You will be elated.

You will show up in person, however, and be dismissed as a crazy lady. You will be hurt. You will wonder if you would have received the same treatment if you had been born male.

You will return to the internet, determined to order the pipes from a faceless corporation who cannot shame you with its “bitch, you want what?!” face. To achieve the custom cuts, you will consider buying the tools necessary to cut and thread lengths of pipe yourself.

You will discover that you can order close approximations of all the lengths of pipe you need — yay! — but not all of the fittings. Flanges, it turns out, are generally not made to accommodate pipe thicknesses under 1/2″. You can buy adapters to make 1/2″ flanges work with 3/8″ pipe, but the adapters are $8 each. You need 6 of them. That plus the cost of the new cutting and threading tools…

You will put the project on hold.

Your father will talk you into trying again. Together, you will decide to settle for 1/2″ pipe. You will go with your father to Lowes, pick out the pipe lengths you need, and get the nice staff there to make 2 customs cuts. You require a few more non-standard lengths, but you will discover that the staff will not cut pipes shorter than 18″. So you will redesign the project on the fly. The store will run out of 1/2″ 3-way-tee fittings, too, so you will go to a second Lowes to pick up the rest.

You will return home with your pipe and start to screw the pieces together to see how everything fits. You will discover that your floor is not level and you will need to shorten the right-most support…. somehow. You will redesign the project again, figuring out exactly where you can subtract length in that particular run of pipe without necessitating another custom cut. You will go to Lowes and purchase two shorter pieces of pipe. While there, you will finally buy the wood boards and paint to finish the project.

And then — only then! — will you have gathered the raw materials necessary to start building your own custom pipe shelving unit.


I may have mentioned before that I’m looking to get a new pet. While my shelf project is temporarily on hold (sell me 3/8″ pipe, damn you, big box hardware stores!), I’m pleased to say that the pet project is now underway.

I’ve settled on a reptile, although I think I’ll keep the specific variety a secret until the pet arrives. I’m a tease, I know — sorry. Gotta get those blog hits up somehow. But! The cage is here, at least!

Finding the perfect cage was tough because, of course, I make everything difficult by insisting that the things I buy must integrate into the design of my house. I don’t want a secret reptile room where I shut the door to hide the ugly plastic tanks and electrical wires; this cage is going in the living room and it’s gonna look like it belongs there.

Lizard cages are not, on the whole, very attractive-looking. Most of the ones I saw had doors that swung open in front, leaving seam lines and hardware and bits of plastic trimming obstructing the view of the wildlife. Plus they were all just a bit too wide to fit on the shelving unit I have planned. I needed something just shy of 11.5″ deep. It quickly became apparent that I’d need to DIY a solution; either the shelf had to be made wider or I’d have to find a way to make a narrower cage. I went with plan B.

First, I ordered this cheap but attractive mesh cage on the internet. The mesh was impractical — my future pet will need the humidity in the tank to elevate at least once a day — but the cage had the right footprint.

So I started off by cutting out the mesh and enlisting Lowes’ help to cut some sturdy acrylic walls. The cage came with a removabe glass bottom, but I needed this sucker to be water-tight so I glued it in. I popped all the acrylic walls into place and siliconed their seams together. And just like that, the cage was seaworthy. Or, um, mudworthy.

Next came the fun part: changing this boring (but attractive!) tank into a vivarium — or, the fancy world for a terrarium housing living animals and plants. I filled the first few inches of the tank with “jungle earth” — or, the fancy name for some dirt and peat moss packed in a bag featuring a picture of a reptile, selling for some insanely inflated price.

The future pet is arboreal, so it’ll need plenty of things to climb. Instead of giving the pet supply people any more of my money for a stick, I went out and found something on my own.

Fancy! Fancy free.

Some quick cuts with a hacksaw later and I was well on my way to creating the perfect lizard jungle gym.

Next came the plants. I had a few suitable houseplants hanging around to take cuttings from, as well as some “terrarium plants” purchased from the pet store a week ago that I had been neglectfully dehydrating. I planted them along with some moss I cultivated during this project.

Throw a light on the whole thing and it really looks nice.

I expect it will take a month or two for the foliage to start filling in, at which point it might be warm enough to have my pet shipped in from a reputable breeder. Tune in next… season?… for the exciting conclusion!

I did not toss and turn last night, thinking about this shelving unit project. Nope. It did not occur to me that maybe the aquarium needs to be on the right side, because that’s where all the outlets are.

I definitely didn’t make a scale model of the unit in Illustrator from scratch. Why would I spend all that time estimating how much each fitting would add to the length of each pipe, overlapping all of the parts just right to show how far they’d twist into each other? A 90″ tall Illustrator drawing with that level of detail? Insane.

And I really didn’t shrink the finished scale model waaaaaay down so I could Photoshop it into my living room.

No way. I have a life, man!

Here are some hastily-photoshopped diagrams for putting together my own pipe shelving!

General dimensions:

Pipe lengths*:

I narrowed the The Brick House’s version and altered the design to accommodate a new aquarium; this one will not be filled with water and therefore should not be too heavy [new pet hint!].

This leaves me with a dilemma, though: normal so-called 12″ wood planks are actually about 11.25 inches wide, but aquariums take up the full foot. I may have to adjust the design a bit more to incorporate wider planks. Some Home Depot research is probably necessary for this part.

All that said, here’s the notated supply list in progress:

Pipe (at 1/4″ or 3/8″):
12″: 4
18″: 4
32″: 2

30″: 3 (Custom cut and threaded)
8″ (maybe a bit longer?): 10
9″ (maybe a bit longer?): 3

Fittings:
90º elbows: 13
3-way tees: 10
Base flanges: 6

Wood Shelves
1″ x 12″(or wider) x 80″ pine planks: 2
1″ x 12″(or wider) x 31″ pine planks: 2

Other Junk
Glossy black spray paint: 2-3 cans
Wood stain

*I know the math doesn’t look right on some of these pipe lengths. I’m assuming that the extra the 3-way tees on the right side will add a bit of length to those joints, so I’m trying to compensate by increasing the length of pipes on the left side. We’ll see if it works…

I’ve been working through a backlog of projects I’ve meant to post about, but couldn’t finish during the normal work week. I get home too late to photograph anything in decent lighting. But when I get vacation time, I’m free to barrage everyone with frequent blog updates!

Here’s the last of my saved-up posts. Holiday decorations!

Using the time-honored fold and snip method, I made a curtain of paper snowflakes. I think I’ll make more and use them in place of the to/from card on my holiday gifts.

Also, I was inspired to try my hand a wreath-making by all of the evergreen boughs we had to slice off of the Christmas tree to get it to sit in its holder.

Design Sponge has a nice tutorial. I wasn’t about to go cutting the roots off of my succulent plants to add them to the wreath, although their version sure looks nice. My version includes some funky seed pods and lots of stuff collected near where I work.

That’s it for me! I think the house is officially festive enough for a holiday party. Hope to see you all there.