Pre-resolution

Well, I did it! I kept my pre-New Year’s resolution to finish the baseboard along my staircase and hallway. But to show you where this project started we actually have to flash back — WAY back, I’m embarrassed to admit, to last January…

…when the aforementioned baseboard was covered in something that resembled Barney the Dinosaur’s cuddly purple hide.

Worse than that, the baseboard wasn’t even one board:

^This is a mess that was clearly never meant to see the light of day.

My options were to rip it all out or try to unify it. And honestly, neither option seemed practical — unification was never going to be perfect, but how would I ever cut another baseboard to match the grooves of my 91 year-old staircase? In the interest of not making a bad situation worse, I decided to make the best of what I was given and leave the boards in place.

I armed myself with a putty knife and got to work. And what do you know — I made amazing progress! At first. Then my hallway rug was delivered and I hastily slapped a coat of primer on this thing, and abandoned the project. Whoops.

It took about two solid days of very dull, repetitive work to finally finish what I had started 11 months ago. After a lot more patching and sanding, the unification plan was (again) going pretty well. I added a bit of molding to make my Frankenboard look a little more purposefully designed:

Then came even more sanding, caulking, and top-coat painting, after which I very carefully peeled away the vintage January ’11 painter’s tape and neatened up my paint lines by scraping the stairs with various pointy objects.

Each side took about an hour and a half to clean up. Just to clean up! SO TEDIOUS. I listened to EIGHT HOURS of Radiolab alone in two days working on these damn stairs.

But it was worth it. Behold:

Frankenboard lives!

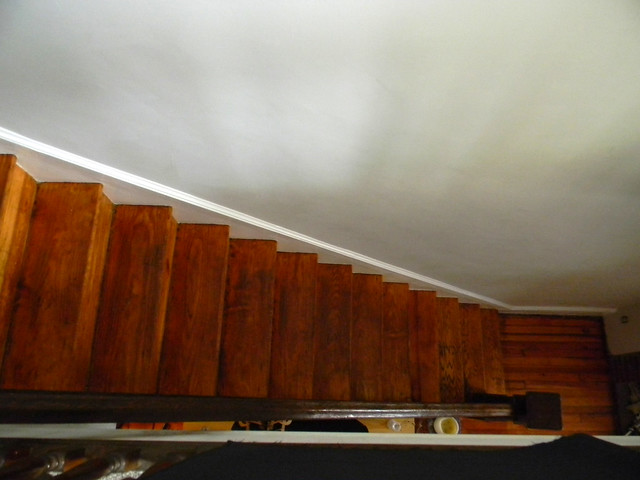
It’s not perfect, of course — it has its share of waves and lumps — but considering the original condition of the thing, I think it came out pretty well.

I also managed to get smaller baseboards (that match the ones in my bedroom) added to the other side of the hallway.

I still have a little finishing work to do on those, but it can wait another 11 months.

Kidding.

I think.

Speaking of 2012, I thought I’d do a quick wrap-up of my greatest accomplishments of the year for new readers. I think this was actually a pretty good year, house-wise. The rest of it was terrible, awful, no good and very bad, but within these narrow walls things did, in fact, improve. In 2011, I:

Thanks, everyone, for your supportive tweets and comments throughout it all. I appreciate it. You help keep me going when I’m on spackle round six of some nutso project, my muscles are sore, my nose is itchy and I’m running on repeat podcasts.

And now, a prix fixe menu is calling my name. Happy New Year, everyone!

Merry FAILmas!

Jack and I tried — and failed — to put up the Christmas tree yesterday.

The tree may have been a bit too big.

And a bit bald at the bottom. The bottom, say, quarter of the tree? Was just a little naked. But certainly more than half of the tree had needles. I think.

And the trunk may have been a bit too wide for the base to hold it straight.

And on top of that, the base may have been broken. At an angle.

[flickr video=6517029405 secret=38741e0160 w=500 h=375]

We’ll try again tonight.

One window at a time…

Ohhhhh, dining room…

And dining room window, where curtains from my first dorm room are still in active use. Like that pair of too-short pants hanging around in your closet that you know you should get rid of, but dammit your paid money for those. Seven years ago.

It was time for the curtains to go. This pair was an awkward size for the window, but I’ve found that curtains in general don’t seem to play well in my little, sunlight challenged house. I’ve committed to the minimalist solution and am installing simple white IKEA ENJE blinds instead.

No bulk, no clutter, just a little diffuse light. And if you walk by quickly enough, you can pretend that the hideous air conditioner — and the battalion of angry pigeons currently occupying the breezeway behind it — isn’t even there.

At $20-to-$40-ish per blind, I haven’t managed to march into IKEA and buy as many as I need. Instead, I’ve been picking up a blind or two whenever I happen to be there. So expect to see window posts for another 6 months. Yay?

Hey, a girl has to reserve a little money to build her collection of shiny objects! On the left, it’s my new $10 piece of student pottery purchased from UPenn’s semi-annual ceramics program fundraiser (<3). On the right, my bowl of Jersey shore seashells finally found a home! Next to the…half-full jar of wine corks!*

Half-full? Pshaw. I can do better than this. I’m off to “work on decorating the house.” Enjoy the rest of your weekend, everyone!

*I don’t know, I probably saw it on Pinterest. Is it too silly?

P.S. Does anyone want those curtains? I’m popping them in the washing machine and when they’re done I will gladly throw them in a box and send them to you for postage money. Fair warning: they do have a really subtle floral pattern.

It’s a date

HALLWAY.

STAIR CASE.

YOU HAVE BEEN LIKE THIS FOR A FULL YEAR NOW.  Unacceptable.

You.  Me.  The week between Christmas and New Year’s.  Let’s finally get this done.

I’m putting my plans here for everyone to see in hopes that you, my fine blog readers, will embarrass me into sticking to the deadline.  I know I will be a lot happier when I don’t have to look at painters’ tape and a pile of unfinished baseboards every time I need to go to the bathroom.

Help me help myself.

48-second gift

I owe you some house updates, but I wanted to share a different sort of project first. This past weekend, a very dear friend of mine married her awesome fiancé in a really sweet, fun ceremony at a nature conservancy in Maryland (congrats, guys!).

Flash back a few months: I was debating what to give the couple as a gift, and the bride suggested that I go off-registry and make something by hand. This is kind of a tricky proposition — as well as you know someone, it can be difficult to narrow in on the style of art she would appreciate in her (and her husband’s!) home. So I thought it might be best to focus on something classic, nature-based, and calming.

My inspiration for the piece came as I was editing photographs for this post. In one of my shell dishes I have a lone cluster of seed pods, plucked from the sidewalk not far from my house. I love the shape of these pods. They have a form that reminds me of a tulip just beginning to open. Their structure implies action — a promise that something good will be arriving.

I started to picture a field of them, reaching up from long stems, almost as though they were flowers emerging from a morning fog.  They don’t grow this way in nature, of course, but that’s why we have such a thing as artistic license.  I think you win one of those after you’ve spent 4 years sketching ugly ceramic pots on rumpled sheets.

I gathered a bunch of additional pods over the course of a few days, and began to sketch an arrangement of them on a pale gray illustration board. I thought it might be fun to document my process and share it here in video form:

[flickr video=6244681651 secret=44fb3d1c0d w=640 h=360]


I used an app called TimeLapse to capture an image every 30 seconds (except in the beginning, where the images were spaced out over a few minutes as I played with the app settings). The video a little wonky since the piece itself is big, requiring me to move it/myself frequently, and it’s filmed over several days in different lighting situations. But still: warp speed drawing is fun to watch.

I took my finished piece to a great local framing shop, where they got to work making the thing all proper and archival and stuff.  No cheap-o plastic frame from the craft store, here!  This is a gallery-quality product.

When my gift came back to me it was wrapped in heavy brown paper, which was practical but not pretty.  So I took on a second, last-minute project: stenciling my own wrapping paper. I used a template to trace a pattern of diamonds with alternating stripes in silver marker.

Et voila!  A DIY wedding gift.  I hope it suits your home, Marissa and Dan!  May your marriage be full of lots of little promises of good things arriving.

Little Fixes

I’m still waiting for resolutions to both the basement plumbing issue and the cornice issue.  Hopefully things will start getting repaired next week, but anticipating the inevitable draining of a savings account can get a girl down, you know?  So this weekend I wanted to tackle a DIY project that would be quick, cheap, and happy-inducing.

These days, my cheerful new purple closets are pretty happy-inducing.  Except for this one nook where I store my belts:

I credit What Would a Nerd Wear for my new-found love of thrift store belts, but my growing collection of $1 bits of leather was getting out of hand.  Some buckles just wouldn’t fit over those round knobs, leaving all the other belts to stack up on two crummy hooks all the way in the back.  Messy belt storage:  the perfect tiny problem to fix with a quick Saturday morning trip to Ikea.

…And some life-hacking, of course. I wanted a little metal rail and some s-hooks, but Ikea’s bathroom/kitchen rails were all too long.  After wandering in aimless loops around the kitchen showroom forever, I discovered these drawer pulls:

Those are the 5-inchers, but they also sold 13″ — perfect.  I grabbed a set and took them home… where I discovered that there really is no way to mount a drawer pull to a wall.  Pulls are normally mounted by feeding a screw through them from the inside of the cabinet.  Duh, Laur.

I pawed through my drawer of loose bits of hardware for some kind of modification, but the answer was right in front of me:

I just grabbed the crummy hooks my more difficult belts were hanging from, and anchored them properly to the wall.  Then I fed their tips right into the existing screw holes in the drawer pull.  Perfect fit!

I organized my belt collection by color because I am slightly insane.

With the little hooks recycled and the rails installed, I then searched for a new home for the set of knobs.  They landed on a stretch of open wall next to the bed:

Hey!  A place to hang your bathrobe or your outfit for tomorrow.  Useful and free.

Organizational improvements always cheer me up, and this set did not disappoint.  Next week it’s back to the gritty stuff, yeah, but until then I can just stare at my belt rainbow.

#Sewstupid

I don’t know why, but I had never asked to see pictures of my parents’ wedding before my mom passed away.  So one of my favorite parts of the memorial service was getting to see a few old images of her in her wedding dress — a pretty floor-length white and floral piece that she had designed and sewn herself.

In the back of my mind, I was still holding on to that picture of my mom happily sewing away when, a few months later, I saw this float by on Pinterest:

A PDF dress pattern!  That I could print from my own computer!  Too easy to pass up.

This particular design featured an easy elastic waist and no zipper, so only beginner construction techniques were needed.  I grabbed my mother’s sewing machine and decided to tackle the project.

I knew next to nothing about sewing, of course; the most I’d managed to do was alter a few waists and hems.  So if you were following me on Twitter, you witnessed a steep learning curve: I accidentally sliced a 3-inch gash in one of the back panels, I sewed an armhole closed, I ran short of fabric for the skirt, I attached fusible interfacing backwards, I bumped a knuckle with a hot iron.  My first dress took a whole day to complete, and halfway through I realized that it would not actually be wearable.

But I was not frustrated.  In fact, I was doing better than I had expected to (thanks to Pattern Runway‘s very detailed instructions, definitions and blog tutorials, and also thanks to my mother’s relatively foolproof machine), so I decided to push forward.  I figured I’d get all the mistakes out of my system and re-do the whole thing a week later.

The first dress’ main problem was my choice of fabric.  Not knowing anything about selecting materials, I had visited a Joann’s in the suburbs and bought a cotton quilting fabric (which is what they had the best selection of — that, and flannel).  I liked the pattern, but the cotton was stiff and didn’t drape the way the design needed it to.  On second consideration, this was clearly a material more appropriate for a throw pillow.

So I decided to step it up a bit for dress #2: I planned a trip to Philly’s famous fabric row (yay!)… where I arrived to find half of the stores closed (huh?).  Now I realize this was Memorial Day weekend, but it wasn’t Memorial Day itself — this was noon on Saturday.  And I feel that if your website says you have Saturday hours, someone should probably be there to open the doors on a perfectly good Saturday.  /rant

The few places that were open had very helpful staff, but I didn’t find much that I liked.  They mostly seemed to specialize in upholstery fabric and satins for bridesmaids.  So I headed off to a fabric store near Market East — also closed.  Finally I remembered a Jomar fabric warehouse in Kensington — the location had gone out of business.

What.  The.  Hell.  Do you have to live in New York to buy this kind of thing…?

Luckily, Jomar had hired a guy to stand outside of the empty Kensington store and redirect people to the next nearest location.  So I found myself driving way north to Rawnhurst, having started the day driving way south to Queen Village.  But the runaround paid off:

At Jomar I finally found a drapey black fabric with a nice subtle texture — a pre-cut 3 yards for about $7 — sitting in the designer clearance section.

This fabric (maybe some kind of rayon…?) had a tendency to shift suddenly under my scissors, and the edges of my cut pieces wanted to fray.  I was convinced I would end up with a crooked, sad little dress.  And I was totally shocked when that didn’t happen.

I am ready for my Architectural Digest photo shoot!  (My house is not, but hey.)

It took approximately 2 full days of work and about $60 to arrive at a finished product ($25 of which was a pair of really good fabric scissors, which I figured I’d use on lots of house-related sewing projects some day; $10 went to buy the pattern [also reusable]; $13 was on fabric for the first dress; a couple bucks went to buy interfacing, buttons, elastic, etc., with plenty left over).  I wouldn’t say this is a super cost-effective way to go about filling your wardrobe, but I actually enjoyed the process a lot.  Listening to the rumble of a sewing machine (and a bunch of good podcasts) is a relaxing way to pass a rainy vacation day.  And you can’t beat the satisfaction of trying on a finished product that actually fits.

This morning I woke up to an email from Pattern Runway with a customer appreciation gift attached:  a free PDF pattern of a long gathered skirt.  While at Jomar I happened to grab a few yards of a blue-gray wool blend from the discount fabric table as well… I think I see a new hobby forming.  I won’t be making wedding dresses any time soon, of course.  But still, I like that image of my mother and me — separated by decades and unfortunate circumstances, yes — but both pinning patterns, pressing seams, quietly passing a rainy day.

Weekend Project Wrap-up

The TV unit project is finished with barbecuing time to spare!  Before I get lost in a pitcher of margaritas, though, here’s a quick run-down of what I did (and why).

For those who missed yesterday’s post, the middle of the unit is a simple Ikea kitchen cabinet.  It has one of those nifty hinges that eases the door closed for you.  (Hung low to the ground like this it would probably make more sense for the door to open from the top instead of the bottom, but I’ve decided to refrain from messing with the hinge mechanism unless this configuration really starts to bother me.)

But a single cabinet wasn’t long enough to visually balance the TV, so I set about adding length.  First, I built little 12″ x 14 3/8″ cubbies, for lack of a non-kindergarten term.  Each has a bottom, a back, and two sides.  Cutting the pieces took a while since 14 3/8″-width boards do not exist in the wild, and also because my miter saw only has a 12″ throat.  So I made two cuts to chop each piece to length (flipping the board over after each cut), and two more cuts to trim the width.

Then I screwed all the faces together.  This is probably the part where a real woodworker would countersink things and glue things and throw some biscuits or dowels in there, but me?  Pre-drilling screw holes is about as fancy as I get.  Luckily, that’s really all I needed to do in this case.

Then the cubbies got a good sanding, priming and painting.  I attached them to the sides of the cabinet with more (non-countersunk, so sue me) screws.  Satisfied with the additional two feet of length, it was then time to cover everything with a “nice” top.

I knew I wanted a funky, industrial-looking board to use as the top of the unit — in part because I like the aesthetic of rougher, knotted pieces, and in part because they’re so much cheaper than the unblemished stuff.  In previous trips to Lowe’s I had spotted some pretty wild contenders:

But with no project idea in mind for them at the time, I passed on buying any.  And of course, they’re not in stock anymore.  So I picked the next strangest board I could find.

Did this tree have the chicken pox, or something?  I love it.

My uniquely-diseased board got cut twice to length on the miter saw, and then I trimmed the width down with a jigsaw.  After lots of sanding and few coats of polyurethane, it was ready to be attached to the cabinet via some hidden interior screws.  And there you have it!

Obviously, this isn’t your traditional media unit.  I’m not much of a TV person these days — I have four DVDs to my name and no A/V or gaming peripherals save for the cable box* — so my main goal here was creating general-purpose closed storage.  I’m currently using this puppy to store pet supplies and a yoga mat.  And art, of course — here’s a shoutout to Ruth, who gifted me the hand-thrown mug in the left cubby.

I knew on some level that I should try to ensure that the cable box would at least change channels when you pointed a remote in its general direction, but I refused to make concessions for that clunky sucker in the project’s design (seriously, when are cable boxes going to get smaller?).  Instead, I suspended the box below the main cabinet with a couple of metal brackets.  It’s still floating, but it has a few inches of ventilation room.  I think it looks pretty good for an afterthought!

(No, I still don’t have baseboards.  Shhhh.)

OK.  Enough blogging, and enough power tools.  It’s time to let the holiday weekend begin.  Hope you’re all enjoying yours!

*My DVD player is built into the side of the TV, which saves me the grief of figuring out where to store one more thing.

Also, thanks go out to my Dad, who helped me move an outlet to get this project done.

Memorial Day Weekend Project

With the boyfriend on a business trip and a 3-day weekend looming, I’ve decided to participate in that fine American tradition of the Memorial Day Weekend DIY Project.

This particular project is something I started over the winter.  The goal: to fix this situation…

…by DIYing a proper media cabinet.

As inspiration*, I looked to DoorSixteen’s “Fauxdenza,” a floating storage unit that Anna created with simple IKEA kitchen cabinets.

As Anna pointed out, being able to see the entire stretch of floor does make a room look bigger.  And my space is even tighter than Anna’s, so the float factor seemed pretty key to me.  My little TV wall is so small, in fact, that I could only fit one cabinet mounted horizontally.  Like so:

Yeah.  It was an improvement, but it still wasn’t great.  The length of the TV and the cabinet were too similar.  I lived with it like that for a few months, debating how to finish it, until the plan finally came to me:  lengthen the cabinet with a book cubby on each side.  And cover the whole thing with a funky industrial wood top, to connect it visually with the pipe shelving unit.

This plan required carpentry skills, however.  And if there’s one thing I regret about college (one thing??  How about most things), it’s that I didn’t learn any real carpentry skills.  So I’m faking it.  But so far, so good!

This is the left cubby.  A little sanding, some paint, some screws, repeating the process for cubby #2… this project should come together in no time!  I have 48 hours to get ‘er done.  Then, finished or not, I’m off to nom some BBQ.

*If you’re at all interested in seeing what inspires me (house-wise, style-wise AND food-wise!), I’ve started cataloging some idea on Pinterest.  Pinterest is a nifty visual bookmarking tool that lets you grab images from the web and post them to “boards” of your thematic choice.  It’s also a place where people compulsively post pictures of very, very thin womens’ stomachs with the tag “fitness!!!”, which is a sad side effect of our culture’s bullshit beauty standards, but if you follow my boards I promise to spare you such nonsense.

Bedroom 2: Electric Boogaloo

I wanted to get better pictures of my current project, but my camera equipment is buried in the rarely-photographed third bedroom:

Is Hoarders: Buried Alive accepting new applicants?

Bedroom #3 has been collecting all of the tools from the renovations of bedrooms 1 & 2, plus about a year’s worth of bank statements, shoe boxes, and other crud that just needs to be tossed out. We’ll get there. In the meantime, excuse the hazy pink-and-cyan iPhone photos.

This is a post about bedroom #2, so let’s start with some before pictures:

Sad trombone.

This room had/has a really difficult layout. It’s very narrow and the door to the hallway is smack dab in the middle of one of the two long walls. When I purchased the house, one end of the room was taken up by a full wall of closets. This left only one possible position for the bed: crammed up against the opposite wall, as seen above.

A few years ago I did what I could to spruce the room up; I lightened up the walls and removed the closet doors, which I hoped would make the room feel bigger.

The facelift helped a little, but in the end I decided that I really wanted those closets to go. They were built so badly and were greatly restricting how the room could be used. So in a fit of temporary insanity I ripped them out myself.

My lovely contractors stepped in at this point and smoothed out all the drywall for me. A little paint here, a little repairing there… skip to some hazy shots of the finished product!

This picture really shows how tight the space is. I don’t use bedroom #2 as a bedroom, of course — this room is reserved for arting, crafting and… ironing? — but I think it would function a little better as one now. I could fit a twin bed in a few different configurations on this side of the room now that the closets are gone. Or maybe even a full bed if I were crazy.

The wardrobe is a super cheap Ikea piece that I believe my old roommate and I bought as a coat closet for our last apartment. It now holds dresses, jackets, some art supplies, and the sewing basket that inspired me to rework this room’s closets in the first place.

The fabric and paper display is a super cheap Ikea towel rack (sensing a pattern yet?). The overstuffed butterfly chair was a gift from my parents for my first dorm room. It has definitely seen better days. The time is coming when I’ll need to decide whether to retire it fully, or replace the cushion part with a simpler, more modern sling. Like…

…this? Mmmm. Not that color, though. Maybe a caramel would work.

And facing the other way:

Hazy hazy. Sorry.

As you might be able to tell, the super cheap Ikea trend continues over here. Shelves, brackets, and desk are all courtesy of the Swedish giant. I had been using a shorter work table and desperately needed an upgrade, but I had a lot of trouble finding a pre-cut size that would work for this space. None of the Ikea desks were the right length, or affordable enough to spill paint on without triggering a panic attack. The solution ended up being this $40 heavy-as-hell tabletop, which was originally designed as a dining room table, cut down a few inches by me and my handy reciprocal saw.

You should have seen me stuff the sucker into my trunk. And carry it a block and a half from the car to my house. PICKUP TRUCK: I NEED ONE. Also, strapping young assistants. Apply in the comments.

My thrift store mirror and picture frame collection hang out over the radiator. Postcard from an old boss. Oh hello, my elbow!

This room hosts and interesting collection of artifacts from the different phases of my career so far. The art supplies are all from my college days. The plant by the window was my desk plant at my last job. The peacock feathers came from there as well.

The blueprint is of the Fisher Fine Arts library at the University of Pennsylvania, and was rescued from the garbage by my manager at the first job I had straight out of college. Now, at my current job, I attend meetings in the very same building.

More art supplies, and more art. And the brick that fell from my bedroom ceiling, which I saved and am itching to spraypaint. Maybe gold, as a hat tip to Filmspotting?

For the moment, though, I’m calling this room finished. I’m pretty pleased with the way it came out; it’s a small space, but now it feels more cozy than cramped. It’s especially nice to catch a glimpse of the plant and mirror in the bright light as I come up the stairs from the living room. Some day, when I have time to put pencil to paper again, this should make for a pretty nice studio nook.

2 bedrooms down, 1 to go!