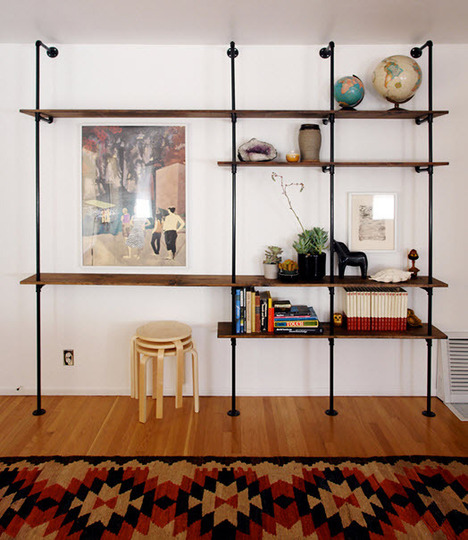
I was beginning to think that Project Pipe Shelving Unit was impossible. That the half dozen or so bloggers I’d run across who had made their own marvelous versions were just Photoshop-faking it. That there existed a vast conspiracy determined to prevent me from DIYing my own industrial-chic shelving.

Let me give you a run down of what it takes to get to this point — day 1 of construction — if you’re anything like me:

First, you will be guided by Morgan‘s comment not to go with the 1/2″-thick pipe she used, but rather 1/4″ or 3/8″ for a sleeker look. You will show up at Home Depot and discover that they do not stock this kind of pipe. You will go to Lowes and find the same thing.

You will go home and log countless hours of internet research. You will discover that you can order 3/8″ pipe online, but the online outlets won’t cut the few custom lengths you need.

You will poll your internet friends, asking them if they know of a hardware store that a) stocks skinny pipes, and b) is willing to cut a few custom lengths for you. A friend will tell you yes, he knows of a place and he has already talked to the staff there for you. You will call this place yourself and be told over the phone that your request is not a problem. You will be elated.

You will show up in person, however, and be dismissed as a crazy lady. You will be hurt. You will wonder if you would have received the same treatment if you had been born male.

You will return to the internet, determined to order the pipes from a faceless corporation who cannot shame you with its “bitch, you want what?!” face. To achieve the custom cuts, you will consider buying the tools necessary to cut and thread lengths of pipe yourself.

You will discover that you can order close approximations of all the lengths of pipe you need — yay! — but not all of the fittings. Flanges, it turns out, are generally not made to accommodate pipe thicknesses under 1/2″. You can buy adapters to make 1/2″ flanges work with 3/8″ pipe, but the adapters are $8 each. You need 6 of them. That plus the cost of the new cutting and threading tools…

You will put the project on hold.

Your father will talk you into trying again. Together, you will decide to settle for 1/2″ pipe. You will go with your father to Lowes, pick out the pipe lengths you need, and get the nice staff there to make 2 customs cuts. You require a few more non-standard lengths, but you will discover that the staff will not cut pipes shorter than 18″. So you will redesign the project on the fly. The store will run out of 1/2″ 3-way-tee fittings, too, so you will go to a second Lowes to pick up the rest.

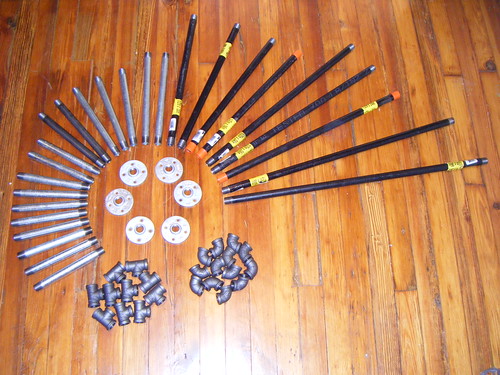
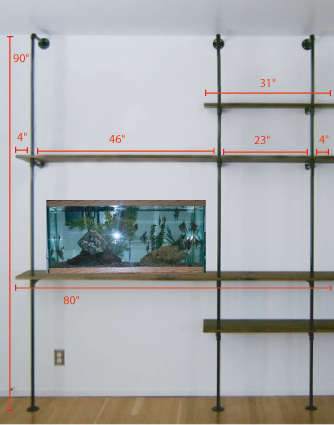
You will return home with your pipe and start to screw the pieces together to see how everything fits. You will discover that your floor is not level and you will need to shorten the right-most support…. somehow. You will redesign the project again, figuring out exactly where you can subtract length in that particular run of pipe without necessitating another custom cut. You will go to Lowes and purchase two shorter pieces of pipe. While there, you will finally buy the wood boards and paint to finish the project.

And then — only then! — will you have gathered the raw materials necessary to start building your own custom pipe shelving unit.


I may have mentioned before that I’m looking to get a new pet. While my shelf project is temporarily on hold (sell me 3/8″ pipe, damn you, big box hardware stores!), I’m pleased to say that the pet project is now underway.

I’ve settled on a reptile, although I think I’ll keep the specific variety a secret until the pet arrives. I’m a tease, I know — sorry. Gotta get those blog hits up somehow. But! The cage is here, at least!

Finding the perfect cage was tough because, of course, I make everything difficult by insisting that the things I buy must integrate into the design of my house. I don’t want a secret reptile room where I shut the door to hide the ugly plastic tanks and electrical wires; this cage is going in the living room and it’s gonna look like it belongs there.

Lizard cages are not, on the whole, very attractive-looking. Most of the ones I saw had doors that swung open in front, leaving seam lines and hardware and bits of plastic trimming obstructing the view of the wildlife. Plus they were all just a bit too wide to fit on the shelving unit I have planned. I needed something just shy of 11.5″ deep. It quickly became apparent that I’d need to DIY a solution; either the shelf had to be made wider or I’d have to find a way to make a narrower cage. I went with plan B.

First, I ordered this cheap but attractive mesh cage on the internet. The mesh was impractical — my future pet will need the humidity in the tank to elevate at least once a day — but the cage had the right footprint.

So I started off by cutting out the mesh and enlisting Lowes’ help to cut some sturdy acrylic walls. The cage came with a removabe glass bottom, but I needed this sucker to be water-tight so I glued it in. I popped all the acrylic walls into place and siliconed their seams together. And just like that, the cage was seaworthy. Or, um, mudworthy.

Next came the fun part: changing this boring (but attractive!) tank into a vivarium — or, the fancy world for a terrarium housing living animals and plants. I filled the first few inches of the tank with “jungle earth” — or, the fancy name for some dirt and peat moss packed in a bag featuring a picture of a reptile, selling for some insanely inflated price.

The future pet is arboreal, so it’ll need plenty of things to climb. Instead of giving the pet supply people any more of my money for a stick, I went out and found something on my own.

Fancy! Fancy free.

Some quick cuts with a hacksaw later and I was well on my way to creating the perfect lizard jungle gym.

Next came the plants. I had a few suitable houseplants hanging around to take cuttings from, as well as some “terrarium plants” purchased from the pet store a week ago that I had been neglectfully dehydrating. I planted them along with some moss I cultivated during this project.

Throw a light on the whole thing and it really looks nice.

I expect it will take a month or two for the foliage to start filling in, at which point it might be warm enough to have my pet shipped in from a reputable breeder. Tune in next… season?… for the exciting conclusion!

I did not toss and turn last night, thinking about this shelving unit project. Nope. It did not occur to me that maybe the aquarium needs to be on the right side, because that’s where all the outlets are.

I definitely didn’t make a scale model of the unit in Illustrator from scratch. Why would I spend all that time estimating how much each fitting would add to the length of each pipe, overlapping all of the parts just right to show how far they’d twist into each other? A 90″ tall Illustrator drawing with that level of detail? Insane.

And I really didn’t shrink the finished scale model waaaaaay down so I could Photoshop it into my living room.

No way. I have a life, man!

Here are some hastily-photoshopped diagrams for putting together my own pipe shelving!

General dimensions:

Pipe lengths*:

I narrowed the The Brick House’s version and altered the design to accommodate a new aquarium; this one will not be filled with water and therefore should not be too heavy [new pet hint!].

This leaves me with a dilemma, though: normal so-called 12″ wood planks are actually about 11.25 inches wide, but aquariums take up the full foot. I may have to adjust the design a bit more to incorporate wider planks. Some Home Depot research is probably necessary for this part.

All that said, here’s the notated supply list in progress:

Pipe (at 1/4″ or 3/8″):
12″: 4
18″: 4
32″: 2

30″: 3 (Custom cut and threaded)
8″ (maybe a bit longer?): 10
9″ (maybe a bit longer?): 3

Fittings:
90º elbows: 13
3-way tees: 10
Base flanges: 6

Wood Shelves
1″ x 12″(or wider) x 80″ pine planks: 2
1″ x 12″(or wider) x 31″ pine planks: 2

Other Junk
Glossy black spray paint: 2-3 cans
Wood stain

*I know the math doesn’t look right on some of these pipe lengths. I’m assuming that the extra the 3-way tees on the right side will add a bit of length to those joints, so I’m trying to compensate by increasing the length of pipes on the left side. We’ll see if it works…

Happy 2010, everyone! Hope the first few weeks have shown a lot of improvement over last year.

The New Year’s Eve party held at this old house went off pretty well. I always forget to snap pictures of the people, but at least I have blurry cell phone evidence of just how much we cooked:

And drank?

Missing from these pictures: the giant punch bowl of egg nog, even more spiced nuts, vanilla roasted pears, a veggie platter with homemade dip, and the crazy cannibal gingerbread cookies a guest brought with her.

As a side effect of actually having edible material in the house, I’ve now attracted a mouse. Those of you who follow me on Twitter probably know about my ongoing struggle to catch this fuzzy gray thing. But enough about that! On to some new projects.

The first major goal I’d like to accomplish in 2010 is to pull off some eye-catching DIY shelving for one wall of the living room. I’ve been inspired by Morgan of The Brick House, who is running her own awesome and very thrifty home improvement blog. She spotted some shelving in a hotel made completely of plumbing materials and wood planks, which she adapted for her own home.

The Brick House shelving unit.

Morgan researching the Ace Hotel’s shelves.

Since then, I’ve seen a few other adaptations of the idea spring up:

From Apartment Therapy.

Is this not the best way to create your own customized shelving? A whole wall like Morgan’s cost only $200. I think I’m going to scale it down a bit for this wall in my house:

(Old picture alert. God, was my house ever that bright? I miss summer.)

Now that I no longer have a fish (boo), and since my Ikea bookshelf is just a piece of crap anyway (double boo), why not put that wall to use? If things go well, I’m hoping to incorporate a home for a brand new pet into my design. But nothing is going to happen until February. I’ve vowed not to overspend any of my budgets this month.

Stay tuned…

I’ve been working through a backlog of projects I’ve meant to post about, but couldn’t finish during the normal work week. I get home too late to photograph anything in decent lighting. But when I get vacation time, I’m free to barrage everyone with frequent blog updates!

Here’s the last of my saved-up posts. Holiday decorations!

Using the time-honored fold and snip method, I made a curtain of paper snowflakes. I think I’ll make more and use them in place of the to/from card on my holiday gifts.

Also, I was inspired to try my hand a wreath-making by all of the evergreen boughs we had to slice off of the Christmas tree to get it to sit in its holder.

Design Sponge has a nice tutorial. I wasn’t about to go cutting the roots off of my succulent plants to add them to the wreath, although their version sure looks nice. My version includes some funky seed pods and lots of stuff collected near where I work.

That’s it for me! I think the house is officially festive enough for a holiday party. Hope to see you all there.

This is a picture of my bathroom before I moved into the house:

Ah, we’ve come a long way. Still not quite there, yet, but I’ve cooked up a couple of improvements so far.

The thing I hated about this bathroom is the terrible matchy-matchyness of it all: the sink cabinet was the same color as the floor, which was the same color as the walls… oh, wait, here’s some painter’s tape-blue trim to shake things up!

No, no, no.

The fix, in progress. Still not good but getting better.

I have plans for the bathroom that involve installing a ventilation system, switching out some fixtures and upgrading the outlets, but so far all I’ve done is paint. Luckily, paint makes a huge difference.

Now we’re talking!

Recognize those drawer pulls? I stole them off the kitchen cabinets that I took down this month.

I’m snowed in! Unleash the torrent of blog posts!

My open shelving project certainly improved the functionality of my kitchen, but something was still amiss.


Oh yeah. The one cabinet on that other wall looks really silly. Not only is it off center above my fridge, but it was placed there with a much larger fridge in mind — a fact that I find confusing seeing as how I can barely walk around this unit, and it was the smallest I could buy.

So this wall got the same treatment as the one housing my dishes, and here are the results:

It’s my collection of gardening supplies! Right by the back door, just where I need them.

(Yes, I have a trowel hanging from a pot rack. I am unapologetic about it.)

The house has finally gotten into the holiday spirit. I present to you my very first Christmas tree!

The stand, skirt, ornaments, and really everything else was brought over by Jack. ‘Cause buying a zillion little glass balls isn’t really in the budget right now. I might have to start investing in some, though, because this tree looks fabulous. Like it belongs in that corner.

I’m totally going to be the person who still has the tree up in May.

What else do I have up my sleeve for the blog? Painting projects, sewing projects, construction projects, redecorating projects… things are really starting to shape up around here. I expect my energy will last right up to the party, during which I will collapse on the couch after one glass of champagne and fall straight asleep.