This is a picture of my bathroom before I moved into the house:

Ah, we’ve come a long way. Still not quite there, yet, but I’ve cooked up a couple of improvements so far.

The thing I hated about this bathroom is the terrible matchy-matchyness of it all: the sink cabinet was the same color as the floor, which was the same color as the walls… oh, wait, here’s some painter’s tape-blue trim to shake things up!

No, no, no.

The fix, in progress. Still not good but getting better.

I have plans for the bathroom that involve installing a ventilation system, switching out some fixtures and upgrading the outlets, but so far all I’ve done is paint. Luckily, paint makes a huge difference.

Now we’re talking!

Recognize those drawer pulls? I stole them off the kitchen cabinets that I took down this month.

I’m snowed in! Unleash the torrent of blog posts!

My open shelving project certainly improved the functionality of my kitchen, but something was still amiss.


Oh yeah. The one cabinet on that other wall looks really silly. Not only is it off center above my fridge, but it was placed there with a much larger fridge in mind — a fact that I find confusing seeing as how I can barely walk around this unit, and it was the smallest I could buy.

So this wall got the same treatment as the one housing my dishes, and here are the results:

It’s my collection of gardening supplies! Right by the back door, just where I need them.

(Yes, I have a trowel hanging from a pot rack. I am unapologetic about it.)

My kitchen is small. Like, maybe 140 square feet small. Tiny. But I spend a lot of time in here, both because I’m starting to really enjoy cooking and because the kitchen is the best spot in the house for picking up my neighbor’s internet connection. For the last year and a half, I’ve had my counter set up like this:

With the dish drainer half-tucked under a cabinet. In theory, this meant that I could dry bowls and short cups under the cabinet, and plates in the slots in front of the cabinet. In practice, the plates prevented me from opening that particular cabinet door. Which prevented me from being able to put the dishes away. Ever.

I don’t know why the solution to this problem didn’t occur to me for, you know, eighteen months, but the morning after Thanksgiving I woke up knowing what I needed: open shelving! So my four-day weekend was absorbed by yet another home improvement project. I even ventured into IKEA on Black Friday. Terrifying.


It was worth it, though. With about $100 and three days, I slapped this solution together:

Now the dish drainer doesn’t block anything. In fact, it folds up when I’m finished so I can reclaim my pathetic four feet of counter space!

The only problem is that now everyone can see my dishes. My horrible, mismatched, half-from-Wal-Mart-and-half-trashpicked-already-chipped-from-an-old-neighbor’s-curb collection of dishes. This is serious broke-ass college student stuff, here. Needless to say, classic simple white dishware is now on my Christmas list.

It’s cold out, yo. Maybe not so much today, but my thermostat told me yesterday that my internal house temperature was 58 degrees (you can tell how much I hate paying for heat). Anyway, it was time to take the garden down, and that’s what I’ve worked on for the last day or two.

I got a few more quirky peppers!

All that’s left now is some lettuce, this crazy mess of sugar snap peas…

…and this one giant tomato vine, which exploded like a plant possessed sometime after the growing season should have ended.

I have suspicions that this one managed to bust a root through the bottom of its pot and through a crack in the concrete below, where it is now feeding on radioactive subterranean Philly waste. I’m leaving it up as a science experiment.

As I was chopping up and composting my dead plants, I kept a careful eye out for mantis egg sacs. Figured I must have one around here, somewhere, considering that I couldn’t pick a veggie all summer long without disturbing a mantis. They’re smarter than to plant their babies-to-be on a flimsy tomato plant, though. I found this thing on my fence:

Looks like the population is secure for next year!

On my last tomato plant, I found the mother mantis herself. She hadn’t really strayed from my backyard all year. And since I’d grown fond of having her around, and it’s getting cold out there (did I mention that?), I did what any true weirdo would do and brought her inside.

I got Carolina some crickets and a black fly, which she caught in about 45 seconds. Damn, these little monsters are quick.

I actually had a pet mantis as a kid for a while. The adults only live about 6 months, and I think my last one made it to January before dying, fat and warm, of old age. Well, I suppose “warm” is a relative concept in this house…

About that Master Bedroom Plan. Uh. I’ve already scrapped it.

Shortly after writing that entry, I went and stared at the giant drywall box that encloses my wood burning stove’s exhaust pipe. The box juts way out into the floorspace in the bedroom; so far, in fact, that it forces me to put my bed up against a wall. Lengthwise, that is. So that one person has to crawl to the foot of the bed to get out of it.

I briefly considered trading my full-sized bed in for a fold-out daybed to save on space. But then I decided, nah, let’s just sledgehammer the box out. There has to be a better solution for the pipe than that thing.

Ah, that’s better. Kinda. Um.

My hope at this point is to get a chimney expert in here to see if we can’t reroute this baby a little closer to the wall. Or, preferably, in the wall.

Apologies for the radio silence. I’ve been traveling. Those of you who follow me on Twitter know what that’s like.

Anyway, I don’t have much of an update; I’ve been spending my weekend doing a little gardening and cooking up some fried green tomatoes. So easy, yet so awesome!

I am, however, about to embark on my next big project: a remodeling of my bedroom. Which looks something like this:

In a word: hideous. In two words: unbelievably hideous. I don’t know why I’ve lived with it like this for a full year. This particular picture of it was taken back in March, because I had anticipated I’d get around to painting it soon. Ha!

Better late than never, though.

I worked on the window trim this weekend, which involved tackling two problems:

  1. The windows are new and were retrofitted to the design of the house, leaving a big plastic border around each window to fill in the gaps between the new unit and the old frame.

  2. They were not installed at the same level. The one on the left is slightly lower than the middle window, which is slightly lower than the right one. At least if you’re judging by the ceiling. And you can’t help but judge by the ceiling when it hits the top of the right window and not the left!

So I’m doing my damnedest to re-cut the window trim in a way that conceals those flaws. And of course, a coat of white paint never hurts.

Master Plan for a Master Bedroom:

  1. Finish hanging the trim for the third window; caulk and prime it.

  2. Prime the rest of the room, including the wacky ceiling. Caulk wacky ceiling panels to their framework.

  3. Die, awnings! Die!

  4. Rip out the shelving systems in the two closets and insert something a little more aesthetically pleasing. My hope here is to eventually remove the closet doors and just frame the closets with pretty pattered curtains, as I think the bay window needs to remain curtain-less.

  5. Yank the light fixtures out and replace them with something that doesn’t look like Granny picked it up in the clearance section at Lowes.

  6. Install a shelf under the right-hand window for my makeup mirror.

  7. Reupholster and paint the trash-picked chair; give it a home under the new shelf.

  8. Pick a room color (pale gray-green?) and paint paint paint.

  9. Install rolling blinds in the bay window.

  10. Rip out the blue carpet. Install a new one in a minimalist neutral tan.

  11. Try to get my bedroom furniture to coordinate, somehow. Paint the bed? New hardware for the bureau? What to do with the bedside table I (also) trash-picked?

  12. Additions? A standing mirror, maybe? A little area rug?

That ought to keep me busy. For a couple of lifetimes.

Here’s a fun project that I started back in June and just managed to finish. The goal was to come up with some sort of mobile seating unit for my living room — something that I could use in front of the stove when I wanted a cozy seat by the fire, but would also be easily moved around the living room when I’m hosting guests. My thought was to create a low bench on coasters. But as with most of my grand ideas, I lacked a grand budget to get the job done. Enter…

Shipping pallets! Now, the good people at Apartment Therapy will tell you that any furniture project involving shipping pallets reeks of low class desperation. And to that I say, “low class desperation” sums up my design aesthetic perfectly. Not everyone gets to afford the gently worn $900 mid-century modern ottoman, mmk? It’s either sit on the pallet or park your keister on the floor at my house.

My shipping pallet was found at a warehouse near my office. I brought it home (it just barely fit in my trunk!) and started off the project by sawing it in half.

Each half got hit with a palm sander for a bit. Then I stacked the halves on top of each other, inserted some dowels at each corner and a few extra blocks of wood for support, and glued the two layers together. After that all the pallet needed was some flat black spray paint and a few locking wheels.

The only real expense to the project was the foam needed for seat cushions. I decided to order cushions in the same size as the ones on my couch, so I could share slipcovers between the two pieces. Two extra cushions plus shipping cost about $50. I had already ordered a new set of slipcovers for the couch (thanks to Bemz, my sofa is now aubergine!), and as soon as they came I switched out the old covers and slapped them on the new bench cushions to finish up the project.

The afghan was crocheted by my mom (who needs a blog, or maybe an Etsy store). And there you have it! Desperation chic.

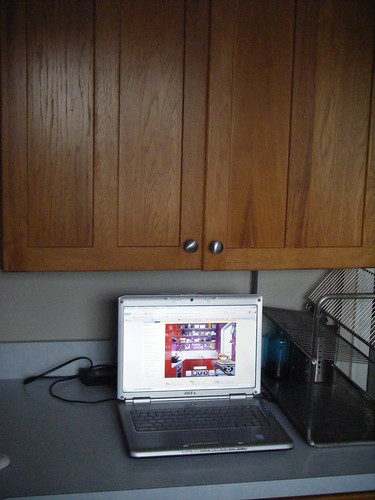
Regular readers of the blog (are there any??) know that I was itching to pick up a miter saw a few weeks ago and get to work on something — anything — besides painting or staining. Well I finally did get my hands on one. And now that it’s firmly bolted to a work table in the basement (please, saw, don’t eat me!), I’m able to tackle overly-ambitious projects like this one:

Why build half of a bookcase where a whole one could fit?

I set out to remedy the situation. Not knowing, of course, that the answer was “a whole one doesn’t fit.” But we’ll get to that in a bit.

From what I could tell, the bookcase was made of three Masonite panels that formed the back and sides, with the shelves attached using screws driven from the outside of the Masonite inward. Then the whole unit was hoisted up and attached to the wall. A few added strips of molding later and it looked as though it had been built right alongside the house. I thought this was a clever construction technique since it hid all the hardware, and I set out to replicate it.

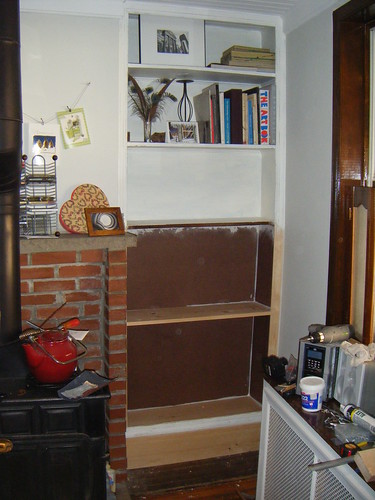
Several hours later, I ended up with a matching lower unit including two shelves attached to their sides and back panels… sitting in the middle of my living room floor. Because when assembled, it couldn’t swing past the stove and the radiator cover to get into the alcove where it belonged. Blast. This is why I only had half of a bookcase!

I quit in favor of having a few glasses of wine and a good night’s sleep. The following day, I came up with the following work-around, which is crazy and long and you can just skip to the pictures below if you’re not interested. Wait, here’s one now!

Anyway, I first removed the back panel of my new unit and swung that one piece into position so I could mount it to the wall. I then removed the top shelf from my now-backless construction, pressed the Masonite side panels together in the gap where the shelf had been, and squeezed them and the lower shelf into place. Bending the right-most panel down and to the left, I managed to get a screwdriver behind it and re-attached it to that side of the top shelf. I was stuck when it came to the other side, though. I raised it into place and drilled some screws directly into the wall underneath it, so the shelf rested on the screws. Then I carved channels into the underside of the shelf to hide the screw heads.

I might not choose to sit on the shelf, mind you, but it’s more than enough support for my books.
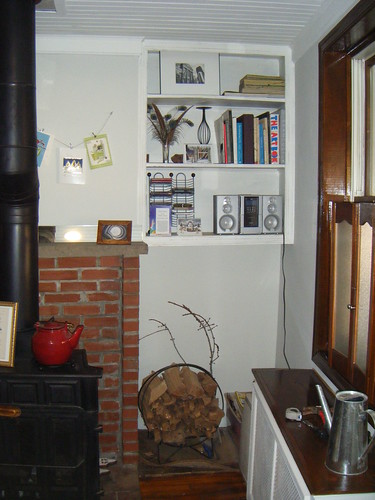
Ta-da!

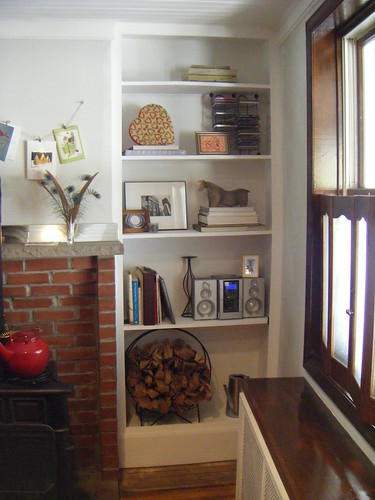
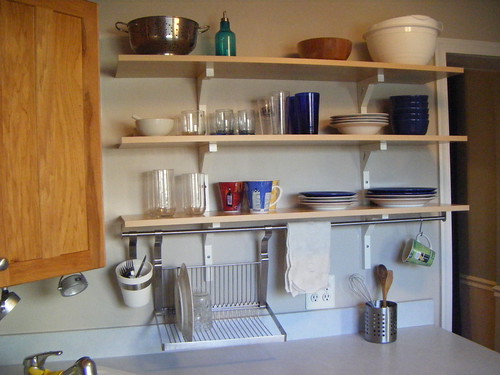
And as an added bonus, I now have a place to house some of my artwork. Here’s an old sculpture of a bull that I made right after graduating college:

I’ve been thinking of posting the bull as the first piece for sale in my Etsy shop. I will get back to making art instead of bookcases, someday. In fact, I think this week might be the week.

My back yard has problems. I’d like to use it as an extension of the house in the summertime, but I seem to be the only person in this neck of the woods with that ambition. Most of my neighbors seem to think of their yards as a place to imprison the dog when caring for it becomes too annoying. And for storing old construction debris. As such, my yard is overrun with flies and mosquitoes.

Trapping them has become something of a hobby, but until I make some headway I decided that I needed a more immediate way to enjoy the back yard bug-free. Enter IKEA, of course. They sell this great mosquito netting draped around a 56″ hoop, which you can hang like curtains around the space you want to protect from the little winged vampires. 56″ was a bit too big for my little back yard, though; I didn’t have a place to hang the hoop where it wouldn’t bump into things. So I went about changing the hoop from a O shape to a D, so I could mount the flat face straight up against the side of my house.

This involved math (circumference = diameter x pi, yo), a hacksaw, and some DIY L-shaped sockets made out of an old curtain rod to hold the half-hoop to its newly straightened side. The project was a success, though, and an even bigger one when I returned to IKEA today and found an outdoor easy chair for $40 off!


Ahh. I’ve written this whole blog entry from the chair and haven’t swatted one fly. Excellent. Happy 4th, everyone!

Jack and I recently made a trip to Anthropologie to pick out a dress for my birthday. When I’m there, I like to scour their homewares section for ideas — not for stuff I can buy, necessarily, but for stuff I can recreate myself on the cheap. Anthropologie and Urban Outfitters really never disappoint in this department. I’ve already blogged about a jewelry stand project I borrowed from UO, and I found some great instructions a while back for making a DIY Anthro endtable out of a set of IKEA small storage drawers and some Home Depot molding. Beats spending $698!

As I’ve been on a gardening kick lately, the new terrariums at Anthropologie caught my eye. I’ve been noticing terrariums on design blogs for a while and they just seem so enticing. Like if you look closely enough at the miniature world behind the glass, you might be rewarded with a tiny unicorn sighting. Or something. Err… anyway, I was ready to grab a bell jar and plant away. Here’s Anthro’s version:

At 12″ high, it’ll cost you a cool $168. Jack and I spotted a much smaller version in the store for $38 — still unjustifiable, if you ask me. So I took a cue from an equally overpriced book they were selling on the “Thrift Store Chic” design aesthetic, and took my business to my local Red White and Blue. It didn’t take long to find a little glass bowl with matching lid for 99 cents. I took it home, scooped some gravel out of my aquarium, borrowed some dirt from the veggie garden, and I was ready to plant. It’s been so wet out lately that I had no trouble finding enough moss to carpet my tiny ecosystem.

After that I added a few… well, let’s be honest, they’re weeds. Two kinds: one that looks like a mini tomato plant with green and pink leaves, and one that looks like a teeny vine with some purple polka dots.

I put the terrarium in the kitchen by the window where the little globe fogged right up. The whole project was less than a dollar. And I like it enough that I think I’ll make a matching one for my bedroom. I just spotted a similar bowl with a stem and foot like a wine glass at a different thrift store…