Simple Upgrades

October has been a whirlwind of wedding cakes, presents, costumes, and freaky weather events for me, but there are a few house changes worth documenting.  So let’s get to it!

I mentioned earlier that a bit of my cornice came apart during August’s freaky weather.

Check it out — it took all of a week before a pigeon made itself right at home in my freaking roof:

UGH.  SCRAM.

Anyway.  I thought it was just wind damage and would be a quick fix, but as fate would have it my roof was actually leaking at the very front edge of the house, which had caused a big chunk of the old cornice to rot away.  So the best (and more expensive — sad trombone) solution was actually to build a whole new cornice.  The contractors banged it out for me, and here’s the before and after:

This is not thrilling stuff, but along with the basement plumbing (which is also fixed — I’m sparing you photographs) it was a repair that had to get done even if it didn’t amount to much of an aesthetic upgrade.  Although the white is nice, I suppose.  Anything’s better than those shingles!

I did try to make a minor visual improvement in the living room over the weekend, specifically to this window that faces the street:

It had no blinds, no curtains — just a few frosted shutters.  I wanted to improve two things:  add a little more privacy, and make this dinky “picture” window look as wide as possible.  I didn’t think those shutters were helping by dividing up the space, so they had to go.  I did like the way my ENJE roller shades from Ikea were working in my bedroom, though, so I decided to give them a shot here as well.

Unfortunately for me, in the last few months the old ENJE shades have been recalled and replaced with a new design that isn’t as easy to hack.  Anna at Door Sixteen had a great tutorial for cutting the old pull-chain shades to a custom width.  But Ikea has since ditched the chain and installed some kind of spring-loaded tension something-or-other in the top part.

I went ahead and hacked mine anyway, but I’m fairly sure I broke its rolling capability.  Or maybe not — I haven’t done much testing because I figured from the start that I’d be leaving this shade down all the time.  So once I got the shade to the width and length I wanted, I stopped futzing with it.  Here it is:

Excuse the dark shots; I was trying not to blow out all the detail in the shade by overexposing.

I definitely think this tiny change is an improvement.  It’s especially nice now that night has fallen and I have a simple white screen over what used to feel like a creepy black hole in the wall.  I have 3 more downstairs windows to go — here’s hoping my hacking skills improve.  Or that I can find some of the old strangler shades on eBay….

48-second gift

I owe you some house updates, but I wanted to share a different sort of project first. This past weekend, a very dear friend of mine married her awesome fiancé in a really sweet, fun ceremony at a nature conservancy in Maryland (congrats, guys!).

Flash back a few months: I was debating what to give the couple as a gift, and the bride suggested that I go off-registry and make something by hand. This is kind of a tricky proposition — as well as you know someone, it can be difficult to narrow in on the style of art she would appreciate in her (and her husband’s!) home. So I thought it might be best to focus on something classic, nature-based, and calming.

My inspiration for the piece came as I was editing photographs for this post. In one of my shell dishes I have a lone cluster of seed pods, plucked from the sidewalk not far from my house. I love the shape of these pods. They have a form that reminds me of a tulip just beginning to open. Their structure implies action — a promise that something good will be arriving.

I started to picture a field of them, reaching up from long stems, almost as though they were flowers emerging from a morning fog.  They don’t grow this way in nature, of course, but that’s why we have such a thing as artistic license.  I think you win one of those after you’ve spent 4 years sketching ugly ceramic pots on rumpled sheets.

I gathered a bunch of additional pods over the course of a few days, and began to sketch an arrangement of them on a pale gray illustration board. I thought it might be fun to document my process and share it here in video form:

[flickr video=6244681651 secret=44fb3d1c0d w=640 h=360]


I used an app called TimeLapse to capture an image every 30 seconds (except in the beginning, where the images were spaced out over a few minutes as I played with the app settings). The video a little wonky since the piece itself is big, requiring me to move it/myself frequently, and it’s filmed over several days in different lighting situations. But still: warp speed drawing is fun to watch.

I took my finished piece to a great local framing shop, where they got to work making the thing all proper and archival and stuff.  No cheap-o plastic frame from the craft store, here!  This is a gallery-quality product.

When my gift came back to me it was wrapped in heavy brown paper, which was practical but not pretty.  So I took on a second, last-minute project: stenciling my own wrapping paper. I used a template to trace a pattern of diamonds with alternating stripes in silver marker.

Et voila!  A DIY wedding gift.  I hope it suits your home, Marissa and Dan!  May your marriage be full of lots of little promises of good things arriving.

Little Fixes

I’m still waiting for resolutions to both the basement plumbing issue and the cornice issue.  Hopefully things will start getting repaired next week, but anticipating the inevitable draining of a savings account can get a girl down, you know?  So this weekend I wanted to tackle a DIY project that would be quick, cheap, and happy-inducing.

These days, my cheerful new purple closets are pretty happy-inducing.  Except for this one nook where I store my belts:

I credit What Would a Nerd Wear for my new-found love of thrift store belts, but my growing collection of $1 bits of leather was getting out of hand.  Some buckles just wouldn’t fit over those round knobs, leaving all the other belts to stack up on two crummy hooks all the way in the back.  Messy belt storage:  the perfect tiny problem to fix with a quick Saturday morning trip to Ikea.

…And some life-hacking, of course. I wanted a little metal rail and some s-hooks, but Ikea’s bathroom/kitchen rails were all too long.  After wandering in aimless loops around the kitchen showroom forever, I discovered these drawer pulls:

Those are the 5-inchers, but they also sold 13″ — perfect.  I grabbed a set and took them home… where I discovered that there really is no way to mount a drawer pull to a wall.  Pulls are normally mounted by feeding a screw through them from the inside of the cabinet.  Duh, Laur.

I pawed through my drawer of loose bits of hardware for some kind of modification, but the answer was right in front of me:

I just grabbed the crummy hooks my more difficult belts were hanging from, and anchored them properly to the wall.  Then I fed their tips right into the existing screw holes in the drawer pull.  Perfect fit!

I organized my belt collection by color because I am slightly insane.

With the little hooks recycled and the rails installed, I then searched for a new home for the set of knobs.  They landed on a stretch of open wall next to the bed:

Hey!  A place to hang your bathrobe or your outfit for tomorrow.  Useful and free.

Organizational improvements always cheer me up, and this set did not disappoint.  Next week it’s back to the gritty stuff, yeah, but until then I can just stare at my belt rainbow.

Weekend Project Wrap-up

The TV unit project is finished with barbecuing time to spare!  Before I get lost in a pitcher of margaritas, though, here’s a quick run-down of what I did (and why).

For those who missed yesterday’s post, the middle of the unit is a simple Ikea kitchen cabinet.  It has one of those nifty hinges that eases the door closed for you.  (Hung low to the ground like this it would probably make more sense for the door to open from the top instead of the bottom, but I’ve decided to refrain from messing with the hinge mechanism unless this configuration really starts to bother me.)

But a single cabinet wasn’t long enough to visually balance the TV, so I set about adding length.  First, I built little 12″ x 14 3/8″ cubbies, for lack of a non-kindergarten term.  Each has a bottom, a back, and two sides.  Cutting the pieces took a while since 14 3/8″-width boards do not exist in the wild, and also because my miter saw only has a 12″ throat.  So I made two cuts to chop each piece to length (flipping the board over after each cut), and two more cuts to trim the width.

Then I screwed all the faces together.  This is probably the part where a real woodworker would countersink things and glue things and throw some biscuits or dowels in there, but me?  Pre-drilling screw holes is about as fancy as I get.  Luckily, that’s really all I needed to do in this case.

Then the cubbies got a good sanding, priming and painting.  I attached them to the sides of the cabinet with more (non-countersunk, so sue me) screws.  Satisfied with the additional two feet of length, it was then time to cover everything with a “nice” top.

I knew I wanted a funky, industrial-looking board to use as the top of the unit — in part because I like the aesthetic of rougher, knotted pieces, and in part because they’re so much cheaper than the unblemished stuff.  In previous trips to Lowe’s I had spotted some pretty wild contenders:

But with no project idea in mind for them at the time, I passed on buying any.  And of course, they’re not in stock anymore.  So I picked the next strangest board I could find.

Did this tree have the chicken pox, or something?  I love it.

My uniquely-diseased board got cut twice to length on the miter saw, and then I trimmed the width down with a jigsaw.  After lots of sanding and few coats of polyurethane, it was ready to be attached to the cabinet via some hidden interior screws.  And there you have it!

Obviously, this isn’t your traditional media unit.  I’m not much of a TV person these days — I have four DVDs to my name and no A/V or gaming peripherals save for the cable box* — so my main goal here was creating general-purpose closed storage.  I’m currently using this puppy to store pet supplies and a yoga mat.  And art, of course — here’s a shoutout to Ruth, who gifted me the hand-thrown mug in the left cubby.

I knew on some level that I should try to ensure that the cable box would at least change channels when you pointed a remote in its general direction, but I refused to make concessions for that clunky sucker in the project’s design (seriously, when are cable boxes going to get smaller?).  Instead, I suspended the box below the main cabinet with a couple of metal brackets.  It’s still floating, but it has a few inches of ventilation room.  I think it looks pretty good for an afterthought!

(No, I still don’t have baseboards.  Shhhh.)

OK.  Enough blogging, and enough power tools.  It’s time to let the holiday weekend begin.  Hope you’re all enjoying yours!

*My DVD player is built into the side of the TV, which saves me the grief of figuring out where to store one more thing.

Also, thanks go out to my Dad, who helped me move an outlet to get this project done.

Bedroom 2: Electric Boogaloo

I wanted to get better pictures of my current project, but my camera equipment is buried in the rarely-photographed third bedroom:

Is Hoarders: Buried Alive accepting new applicants?

Bedroom #3 has been collecting all of the tools from the renovations of bedrooms 1 & 2, plus about a year’s worth of bank statements, shoe boxes, and other crud that just needs to be tossed out. We’ll get there. In the meantime, excuse the hazy pink-and-cyan iPhone photos.

This is a post about bedroom #2, so let’s start with some before pictures:

Sad trombone.

This room had/has a really difficult layout. It’s very narrow and the door to the hallway is smack dab in the middle of one of the two long walls. When I purchased the house, one end of the room was taken up by a full wall of closets. This left only one possible position for the bed: crammed up against the opposite wall, as seen above.

A few years ago I did what I could to spruce the room up; I lightened up the walls and removed the closet doors, which I hoped would make the room feel bigger.

The facelift helped a little, but in the end I decided that I really wanted those closets to go. They were built so badly and were greatly restricting how the room could be used. So in a fit of temporary insanity I ripped them out myself.

My lovely contractors stepped in at this point and smoothed out all the drywall for me. A little paint here, a little repairing there… skip to some hazy shots of the finished product!

This picture really shows how tight the space is. I don’t use bedroom #2 as a bedroom, of course — this room is reserved for arting, crafting and… ironing? — but I think it would function a little better as one now. I could fit a twin bed in a few different configurations on this side of the room now that the closets are gone. Or maybe even a full bed if I were crazy.

The wardrobe is a super cheap Ikea piece that I believe my old roommate and I bought as a coat closet for our last apartment. It now holds dresses, jackets, some art supplies, and the sewing basket that inspired me to rework this room’s closets in the first place.

The fabric and paper display is a super cheap Ikea towel rack (sensing a pattern yet?). The overstuffed butterfly chair was a gift from my parents for my first dorm room. It has definitely seen better days. The time is coming when I’ll need to decide whether to retire it fully, or replace the cushion part with a simpler, more modern sling. Like…

…this? Mmmm. Not that color, though. Maybe a caramel would work.

And facing the other way:

Hazy hazy. Sorry.

As you might be able to tell, the super cheap Ikea trend continues over here. Shelves, brackets, and desk are all courtesy of the Swedish giant. I had been using a shorter work table and desperately needed an upgrade, but I had a lot of trouble finding a pre-cut size that would work for this space. None of the Ikea desks were the right length, or affordable enough to spill paint on without triggering a panic attack. The solution ended up being this $40 heavy-as-hell tabletop, which was originally designed as a dining room table, cut down a few inches by me and my handy reciprocal saw.

You should have seen me stuff the sucker into my trunk. And carry it a block and a half from the car to my house. PICKUP TRUCK: I NEED ONE. Also, strapping young assistants. Apply in the comments.

My thrift store mirror and picture frame collection hang out over the radiator. Postcard from an old boss. Oh hello, my elbow!

This room hosts and interesting collection of artifacts from the different phases of my career so far. The art supplies are all from my college days. The plant by the window was my desk plant at my last job. The peacock feathers came from there as well.

The blueprint is of the Fisher Fine Arts library at the University of Pennsylvania, and was rescued from the garbage by my manager at the first job I had straight out of college. Now, at my current job, I attend meetings in the very same building.

More art supplies, and more art. And the brick that fell from my bedroom ceiling, which I saved and am itching to spraypaint. Maybe gold, as a hat tip to Filmspotting?

For the moment, though, I’m calling this room finished. I’m pretty pleased with the way it came out; it’s a small space, but now it feels more cozy than cramped. It’s especially nice to catch a glimpse of the plant and mirror in the bright light as I come up the stairs from the living room. Some day, when I have time to put pencil to paper again, this should make for a pretty nice studio nook.

2 bedrooms down, 1 to go!

Day 58: Finished, with pictures to prove it

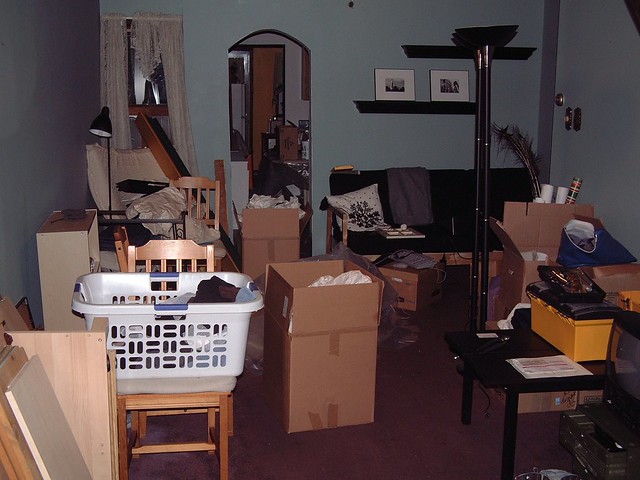
The day (glorious day 58) has finally come. My main bedroom is complete. But before I show the rest of the finished product, we have to dwell on these hideous “before” shots one more time. I know it’s painful.

I took these in March ’09, which is when I thought I was about to start fixing up this bedroom. Ha. Hahahaha.

This is how the adventure starts: with yellow and blue paint, green awnings, and a drop ceiling. (Note that the ceiling hits right above the window trim.)

Small closets with poor organization systems.

Wasted space and awkward bed placement thanks to the stovepipe hidden in that drywall…protrusion? Box? Thing you have to walk around in order to enter the room? Constant source of aggravation?

Anyway. I won’t subject either of us to any more photos of fug.

But one more thing before we get to the after pictures: I need to thank my parents, who were major financial contributors to this project. So much so that I joked with my boyfriend that there ought to be bench or a brick with their names on it somewhere in here. Perhaps I could engrave the brick that fell out of the ceiling as I tore it down. Or perhaps we should start referring to this corner of the house as the “Pat and Mike Honorary Wing.”

Either way, I just wanted to be honest and admit that I did not do this alone. My contractors were also awesome, leaving this blog with a complete lack of painful-yet-entertaining contractor horror stories. Also awesome: my boyfriend, who shared his tools and who helped me paint this sucker twice.

OK, here goes. Let’s start with the biggest change: the ceiling.

As you can probably tell from those windows, the contractors were able to raise the ceiling about two feet. I can’t stand on my toes and touch it anymore! They also gave me lots of insulation, plus four recessed lights and a brand new ceiling fan.

The closets were completely torn out and rebuilt. Unlike the old closets, these have doors that match their full width (so I won’t be fishing around for sweaters that have fallen into corners).

I went with a deep glossy purple paint for the doors, which I love. Love. It’s fun and bold, but with just enough seriousness. The color also looks killer against the orange of my dresser. It took five coats of paint to reach this level of saturation, but it was worth it.

Live and learn. And then buy a darker primer.

But the insides of the closets are obviously the best part. The big double closet on the right for clothes…

…and the little closet on the left for shoes, bags, belts, laundry, and toiletries.

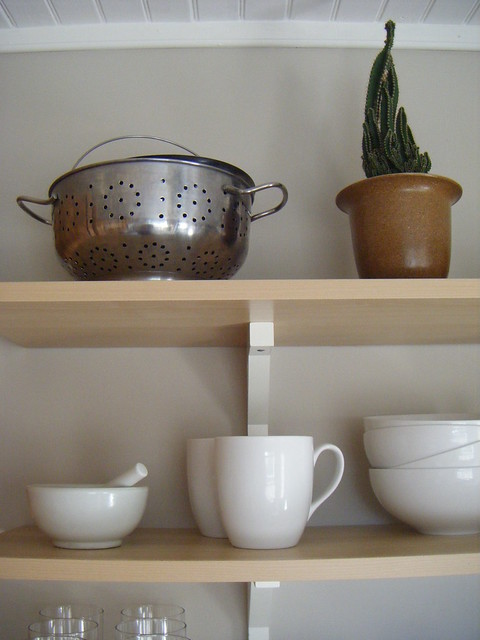
This is all organized with the Ikea Antonius system. I have to say, even though the pictures make me look completely OCD, it’s so nice to have all of my accessories visible! I find I’m far less likely to grab my standard uniform of a black shirt, gray pants and black shoes now that all of my other options are laid out infront of me.

And in between the closets:

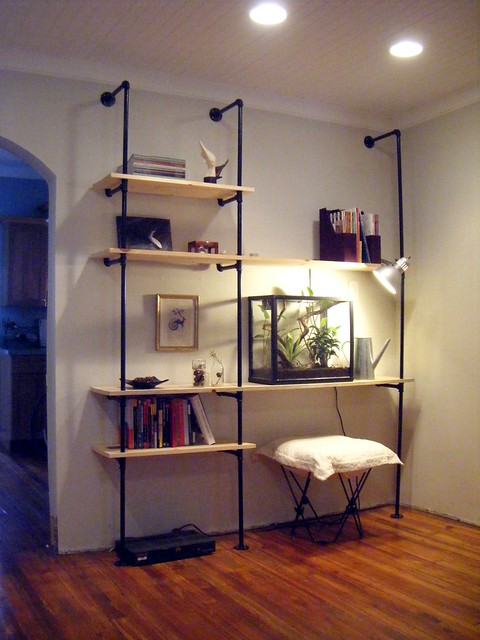
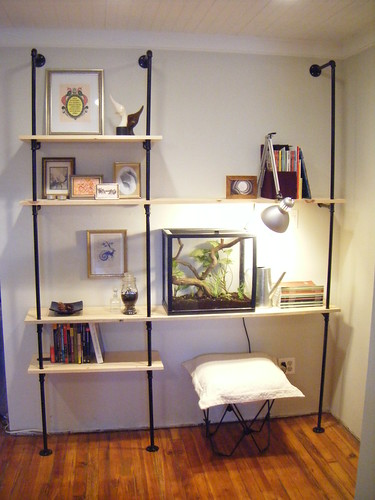
The old stove pipe space is completely inverted; where there was once a protruding box, now I have an inset bookshelf.

I’m using the middle shelf as a tiny vanity, with an adjustable wall-mounted light from Ikea to help me see what I’m doing.

The jewelry stand is from Urban Outfitters, but the jewelry itself is largely Etsy (I love Edor’s shop for its simple, classic necklaces) and local craft fair purchased, with a few pieces from my Mom.

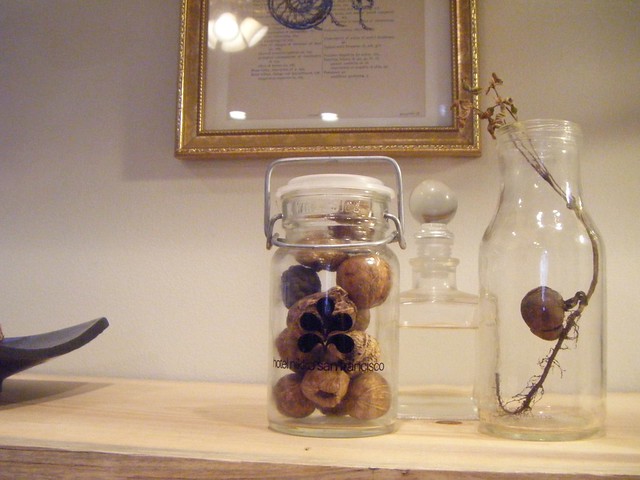
The top shelf is more flexible and will probably get rearranged often as I amass more books and art.

More craft fair purchases (bird by Rachel Reinfurt), plus a cyanotype that I made with lots of help from Jorj Bauer.

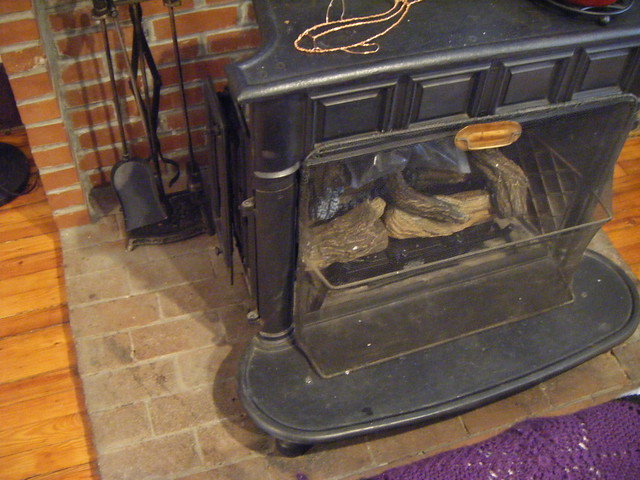
This is all that remains of the stove pipe. Since I converted the wood stove in the living room to gas, it no longer needs to vent through to the ceiling. Now I just have this little floor vent to carry up some heat from the living room below. The carpet is working out well, too. It’s unobtrusive and fun to walk on and easy to clean.

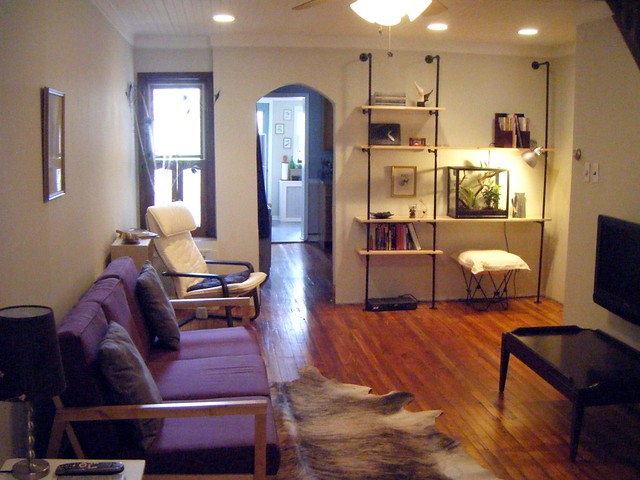
So that covers the new layout. Now let’s talk about furniture!

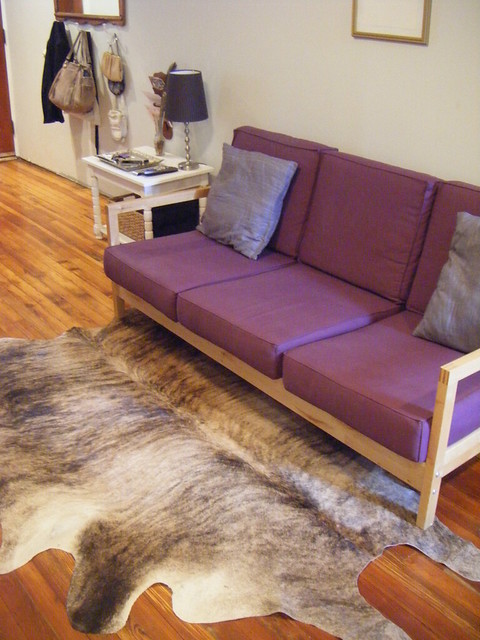
My bed is a basic Ikea Malm (also known as the bed most likely to bruise your shins), and I’m so happy to have it in a place where both sides are now accessible without climbing. The painting above was done by me, on an old window pane that the previous owners left behind. (I’ve got another in the basement — want a painting?)

My side table was trash picked. I’m not sure if it really fits my style, so I haven’t attempted to refinish it. I would probably prefer something a little less frilly. But the new modern lamp (Ikea) against the old scroll-legged table is oddly appealing to me, so for now it stays.

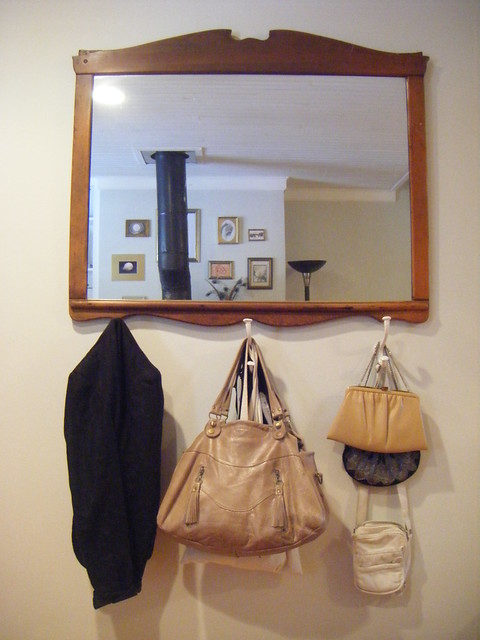
I had wanted a big leaning mirror here — one that would rest on the floor — but Ikea’s version was too wide for the space. I might look at other options, but this old $10 Target mirror (with a fresh coat of paint) works pretty well.

The dresser is from my original childhood bedroom set. I think I’ve had it since I was six. It has definitely seen better days — I regularly spilled nail polish remover on it as a teenager — but with a little oil and wax it still cleans up pretty good. I decorated it with a little succelent garden.

The chair was also trash picked; at some point I’ll reupholster it. The bag is by Etsy seller valhallabrooklyn, who I am reluctant to link to because each time I do a friend buys “my” purse in a different color. Aww who am I kidding? I love giving props to talented people, and she was such a pleasure to work with.

The windows have two roller blinds; an outer screen and an inner blackout blind, both from Ikea. I didn’t want to deal with complicated curtains in the bay window, and this arrangement works perfectly and looks elegant.

So that’s it! A two-month project is finally finished. The house is not finished, of course, but I’ll still be sipping an adult beverage and doing the happy dance later today. What do you think?

2 Years – Living Room

Whenever I feel depressed about the speed of progress around the house, I just drag out this picture. It was taken about 3 weeks after I moved in. The walls are blue, the kitchen is yellow, the curtains are lace, the floor is carpeted, and my stuff is everywhere.

I’m still not completely in love with my living room, but I’m certainly closer! Here’s a shot taken from the same position today:

And facing the opposite way:

If you guessed that the sculpture by my front door is there only because I’ve been avoiding carrying it back down the stairs into my basement, you get a sticker. Heavy sucker. If it stays there long enough, I might start using it as a coat hook.

I still love my cow rug, which is a relief considering how much of a presence it has in this room. It’s the easiest thing in the world to care for, though. Just sweep it off with a broom along the grain of the hair, or wash it with a sponge the same way.

If I were a real design blogger, with sponsors and advertisers and product reviews and fancy stuff, I would totally have styled this shot on the left with some summer scarves and, like, a burlap grocery bag full of flowers. But hey, this is how the house actually looks. I hang coats on my coat hooks. And I never have money for flowers.

The pipe shelving unit project is a favorite accomplishment. It has become something of a curio cabinet for me, attracting all kind of feathers, seeds, plants, shells, and art about feathers, seeds, plants and shells.

I do rotate items frequently, which keeps it fun. I’m trying not to bog this unit down with too much stuff.

Well, except for the gecko. He’ll be a permanent fixture once he’s big enough to move into the new vivarium.

Here’s the rest of the art collection:

These pieces also rotate. I’ll probably need to do some editing of the wall-o’-art in the near future; I’ve gathered a whole lot of stuff.

I like the effect for now, though.

And now it’s time to talk about the lingering ugly bits. Because while I may have a cute end table on this side of the sofa…

… what the heck is this thing? A bland Ikea bookcase holding a yoga mat and a cricket cage? No good. This should obviously be some kind of low, modern side table/credenza with doors to hide all of the weirdness. Like this thing. Too bad all the good thrifting for such furniture is on the west coast.

I think I have settled on using two end tables, though, over a coffee table. My living room is a decent size for a small Philly rowhome, but the space is long and skinny. Having that coffee table in the dead center of the room really messes up the flow of traffic. Which is why my table is here:

Yeah. That’s… special. I’m also going to need a low, modern media storage system, aren’t I. Why is attractive furniture so hard to get? Can’t I just build it all with pipes?

Oh, and then there’s that thing. Right. Pipes won’t fix that nonsense.

Ooorrr that situation. The astute among you may have noticed that my cable box is hiding somewhere that is nowhere near my TV. Definitely need to fix the wiring and consolidate this mess within a media storage unit.

And then there’s this. Every time my heating contractor comes in here, he tells me not to paint the brick. I remain unconvinced. I’ve scrubbed the heck out of these floor-level puppies and that’s as clean as they get.

Something’s getting painted. I don’t know what and I don’t know what color it will be, but it needs to happen soon.

2 Years – Kitchen and Dining Room

My 2-year house anniversary post is very belated. Truthfully, I haven’t accomplished much this summer. Instead of painting and crafting, a lot of my time went into applying and interviewing for new jobs. It took 7 interviews, guys. It’s tough out there.

But that initial effort has resulted in a much happier, healthier blog author today. There’s even a little extra money kicking around for new projects (if I can manage to stop spending it on work-appropriate clothing!).

For this year’s entry, I’ve decided to go for honesty. I’ve made definite improvements to each room in the house, but lingering ugly spots remain. And ugly spots are entertaining, too, so I’m not gonna hide them from you.

Let’s start with The World’s Smallest Kitchen ™!

Man, every year I do this post I wish that my camera hadn’t been stolen, robbing me of all of my before pictures. These crappy inspection photos are worthless.

Anyway, that was then. Here’s where we are today:

The open shelving project has turned out to be one of my favorite things about this room. I had some concerns going in; people warned me that my dishes would get dusty or sticky, plus I cheaped out and went with some Ikea laminate shelves, so I was worried they might warp or peel. But so far, I have to say that the entire arrangement has been trouble-free.

And if you happen to have nice dishes (thanks, Mom!), it’s really lovely to see everything out in the open.

My second-favorite thing is this little window of bottles and plants. I rotate items in and out of this arrangement pretty frequently. Translation: sometimes I kill things.

I like the way the closed containers fog up in the morning.

And now for the ugly. I’ve pretty successfully rid this room of the ugly, except for one thing:

Sky. Blue. Counter tops. I’ve lived with them long enough now that I no longer wonder WHY anyone would pick this color every time I peek at them. And that scares me.

Let’s move to the dining room!

Ouch. Let’s not. I’m looking at this now and wondering if the green (?!) counter top in this room was picked to match the green chairs. I can offer no other explanation.

Today we’re a little better off, color-wise:

We still have the green and it still needs to go, but at least there isn’t any yellow for it to fight with.

That thing in the corner of the first picture is my gecko’s starter terrarium. He’s been living in this room because it has an air conditioner, and apparently I care more about moderating his temperature than I do my own.

I see you!

This is the first room I started working on, and it’s probably time to revisit it. I’d like to use this radiator cover space in a more interesting way. The room could use a rug, too.

Hulk smash green counter top! But that’s not even the ugliest bit:

Ah yes, the mouse hole that I plugged with steel wool, caulk, and a boat load of poison. Also, the electrical outlet that was stuffed into a hole far too big for it, and is therefore screwed to nothing.

I could fix most of this situation with baseboards, if I ever get around to baseboards. The kitchen had some that I saved when the floors were redone, but the living room had nothing. I don’t know if I can match the old ones so I haven’t reinstalled them.

Yeah. That’s a pretty poor effort.

Coming soon: the living room and more!

Pipe Shelving Unit – Finished!

It has been a long time coming, but today I finally get to share with you some before…

…and after pictures!

90% of the pipe shelving unit project was preparation. After the measuring, planning, re-planning, struggling to find supplies, etc. was behind me, the project came together in just a few short hours. I had expected to spend all weekend assembling the unit, and later to sum up the experience with a blog entry that began, “No part of this project was simple — do not attempt!” And yet I found myself staring in bewilderment at a finished product sometime around 3:00pm on Saturday. But let’s go back to the beginning.

The first step was to trim my longer two boards down a bit (I was too generous when estimating the size of my wall), and then to drill several 1″ holes at specific points where the pipes would pass through.

This picture makes my basement “woodshop” look almost respectable. I assure you, it is not.

Once the cutting was finished and the boards were sanded a bit, I briefly considered patching up all their knot holes and staining them darker. But what I liked about this project was that it used only industrial materials — in keeping with the theme, I had purchased the cheapest utility-grade wood possible — so why not just embrace the imperfections? I decided to roll with the “scratch-and-dent section of Lowes-chic” look. This is probably what kept my assembly time down, and I don’t regret it at all. You’ve gotta cut yourself a break when you can.

From that point on everything was easy as pie, as demonstrated in this adorable gif:

avatars myspace with Gickr

Here’s a shot showing how the shelves are supported:

Since the elbow fittings are designed to have just the same height as the tee fittings, the boards sit very evenly on these two points. And since the majority of the weight of the unit rests right on the floor, all I had to do was secure the top flanges to the wall with a couple of drywall anchors. The unit is remarkably stable. I’ll have to wait and see if the boards start to deflect over time, but if they do I can easily unscrew the whole thing and replace them.

And that’s it! A 3-month project finally wraps up. I’m sure I’ll be posting more pictures soon, particularly when that vivarium’s new resident arrives…

Notes:

1) I’m sorry all of my pictures look like they’re taken with a fish-eye lens. I’m working with a super cheap camera right now.

2) I’d post the final supply list, but I’m pretty sure it would only work for someone with a floor as sloped as mine. I believe the pipes on the left, starting from the bottom, are 18″, 12″, 24″, 10″, and 18″ segments. The segments on the right are something like 29″, 24″, and 31″, though 32″ was probably ideal. Shelf supports are 8″ each and the pieces that connect to the wall up top are 10″, though if you can find 9″ that might work better. BUT only if your wall is nice and flat!

3) Yes, I know, I still have no baseboards. It’s been — what? — a year? I should really tackle that next.

This is a picture of my bathroom before I moved into the house:

Ah, we’ve come a long way. Still not quite there, yet, but I’ve cooked up a couple of improvements so far.

The thing I hated about this bathroom is the terrible matchy-matchyness of it all: the sink cabinet was the same color as the floor, which was the same color as the walls… oh, wait, here’s some painter’s tape-blue trim to shake things up!

No, no, no.

The fix, in progress. Still not good but getting better.

I have plans for the bathroom that involve installing a ventilation system, switching out some fixtures and upgrading the outlets, but so far all I’ve done is paint. Luckily, paint makes a huge difference.

Now we’re talking!

Recognize those drawer pulls? I stole them off the kitchen cabinets that I took down this month.